Introduction
This example demonstrates a simple way to receive email into a database with POP3it Pro.
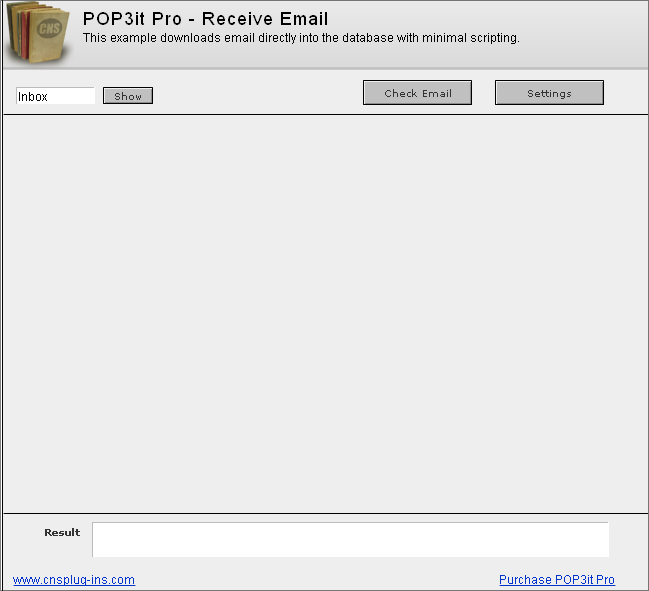 Receive Email example database
Download Example File
Account Setup
In order to connect to Mail Servers, you need to set up accounts for them. Click the “Account Setup” button which calls the “Edit Accounts” script. This script opens the Account Configuration Dialog using the POP3it_ConfigureAccount function.
Need more information about working with accounts or how to automate account creation?
See the Account Configuration section of the documentation for more information.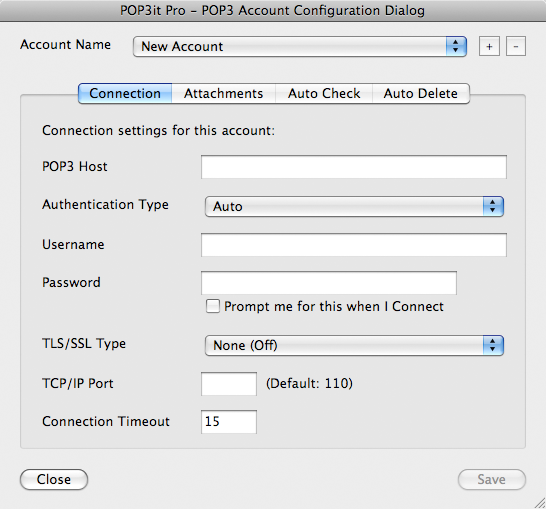 Account Configuration Dialog
At the top of this dialog, you will see a list of Account Names. If you have not created a new account yet, press the “+” button.
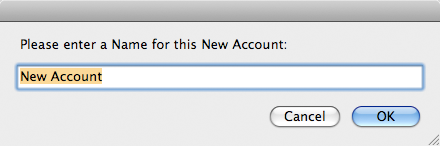 Add New Account
- The POP3 Host is the full domain name or IP address of the Mail Server you want to connect to.
- The Authentication Type is the type of authentication your Mail Server requires, if applicable.
- The Username and Password are what you need to connect to the Server. If you don’t want to store your Password, you can optionally click the “Prompt me for this when I Connect” checkbox to have the plug-in ask you each time.
- If your Mail Server requires SSL/TLS connections, you can adjust that setting.
- The TCP/IP Port field is where you define an alternate port to connect on. Leaving this field blank uses the default port 110.
- Finally, the Connection Timeout lets you define how long POP3it Pro should wait for a response from your Mail Server before giving up.
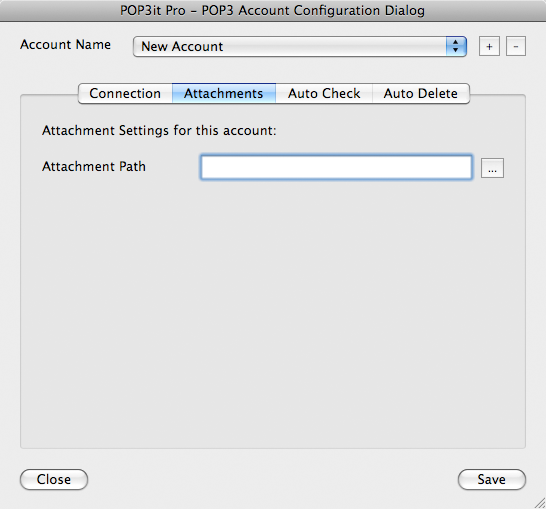 Attachments Tab
On this tab, you can specify the location of where the plug-in should download attachments that are in your email. If your email contain any embedded or inline attachments, they will be put in a folder called “Inline” which can be found inside the Attachments folder.
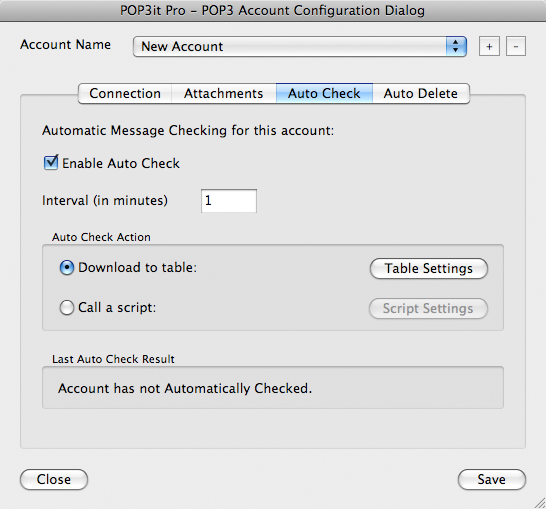 Auto Check Tab
This tab allows you to turn on Auto Check. Auto Check will check your email account on an interval you specify.
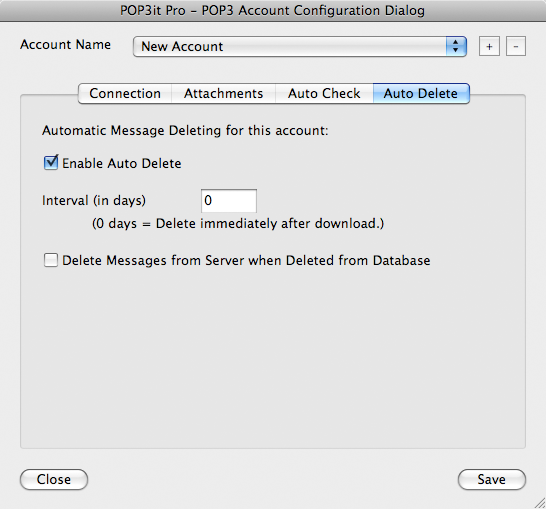 Auto Delete Tab
On this tab, you can specify if the plug-in should delete email off your mail server. You can specify the number of days the plug-in should wait before deleting email off the mail server.
Click the Save button, and then the Close button when you are finished adding accounts.
Download Email
When you are ready to download your email, click the Check Email button. This will download email from all accounts set in the Account configuration dialog. Other examples will allow you to specify exactly what Accounts to download from, but for this example it will download email from all defined Accounts. A new record will be created for each email, and any attachments will be downloaded into the Attachment folder as specified in the Account configuration dialog. When the plug-in is done downloading email, click on an email to view it. If the email contains an HTML part, the HTML will be be shown in a web viewer object (FileMaker 8.5 and above). Earlier versions of FileMaker will show the Text part of the email with an option to open the HTML in your system default web browser. Attachments will show under the body of the email with an option to open them if clicked.
View Results
This example has a Result field where the plug-in Results are shown. This is where the plug-in can give you feedback on what it is doing. If an error occurs, it will report the error in the results field which can help you fix any issues you may be having. It will also report its successes so that you know everything is going as planned.
To determine which field contains the plug-in results, look at the script you are using to call the plug-in. The script will contain Set Field script steps which are how the plug-in is called. For example, the “Edit Settings” script contains a Set Field script step that looks like:
Set Field [ POP3it_Messages; POP3it_ConfigureAccount ]The Target field of the Set Field script step is the “POP3it_Messages” field, which is how the “Result” field is determined as what will hold the feedback from the plug-in.
Access the Plug-in
When using plug-ins (not just ours), they do not add new script steps, but instead add new functions that are available in the calculation engine.
To see a calculation that tells the plug-in what to do, go to the “Scripts” menu, choose “ScriptMaker” or “Manage Scripts”. Next, double click the script you want to view. Note that we are using the “Set Field” script step which consists of two settings. The “Specify target field” button allows you to choose which field you want to set. In our case we want to set the “Result” field. The second specify button is where the POP3it Pro calculation exists. Click this button to see the calculation that is used to tell the plug-in what to do.
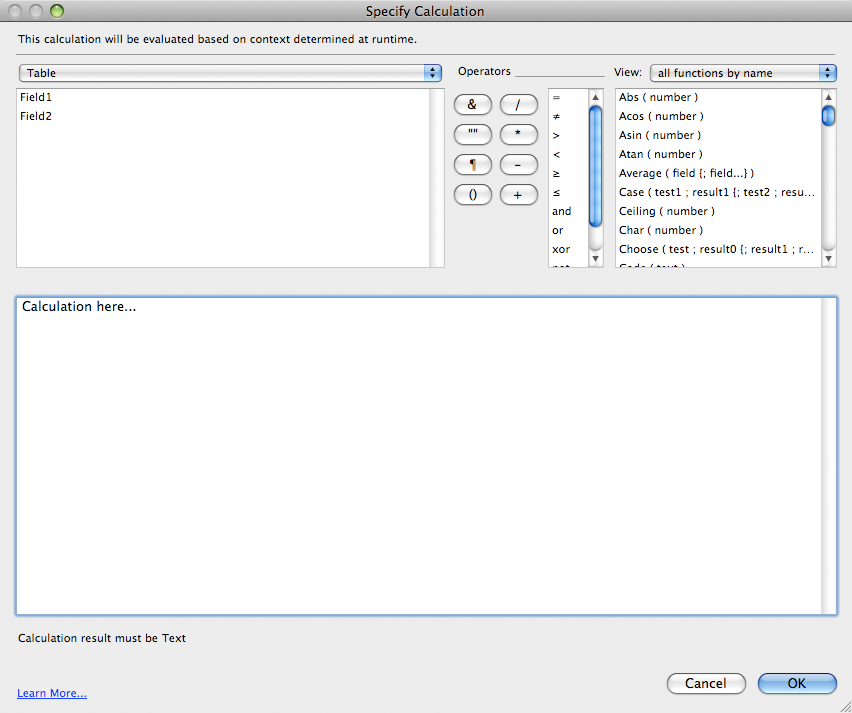
The “Specify Calculation” window as shown in the image above is found in many different places in FileMaker. The most common places to use the plug-in is within the "Set Field or “Set Variable” script/button steps.
In FileMaker’s “Specify Calculation” window, the plug-in is accessed using the “POP3it_FunctionName” functions. To find a list of these in FileMaker, click “View” menu in the top right corner of a “Specify Calculation” window, select “External Functions”, and then scroll through the list until you find the plug-in name. There are many functions available that allow you to do a variety of different things. For a complete listing of the functions and help for each one, see the Functions tab of the POP3it Pro Knowledge Base.
Script Explanation
###Downloading Email
To understand how the plug-in downloads email into this example, open ScriptMaker/Manage Scripts and edit the "Check Email" script.
Set Field[POP3it_Messages::Result; POP3it_CheckAccount]All the script does is call the POP3it_CheckAccount function which starts the download process. This function is the equivalent to the “Check Email” or “Get New Messages” button in a normal email client.
POP3it_CheckAccount{( AccountName {; ShowStatus } )}This is the function prototype which shows a parameter for specifying Account Name(s) to download email from and a parameter for whether or not to show the status window. For this example, we wanted it to download email from all defined accounts, which is done by not specifying an account name at all. By default, the status window is displayed so you would only set the 2nd parameter if you did not want the status window displayed.
So, how does the plug-in work with such little scripting involved?
Open Define Database by going to the File menu, Define, Database, and click on the Tables tab. There are two tables defined here; one named POP3it_Messages and the other POP3it_Attachments. The two tables have these names for a reason. When the download process is started with the POP3it_CheckAccount function, the plug-in looks for these exact table names, so if they were changed, the downloading process would not work. In addition to the specific table names, there are also specific field names. Note, there is a way to change the table and field names and we will get into that later in the documentation. Click the Fields tab and select the POP3it_Messages table from the drop down list to look at the field names. All of the fields beginning with “POP3it_” are named specifically so the plug-in can find them and put the email data into them. If you do not want a specific part of an email you can either rename or remove the field and the plug-in will not give you that data. For example, if you do not want the subject for your emails, rename or remove the POP3it_Header_Subject field, and the plug-in will no longer give you the subject for emails.
If you look at the POP3it_Attachments table you will see the same type of field names. These fields also are required when the plug-in downloads attachments. Click on the Relationships tab and you will see a single relationship between the two tables. When an attachment is downloaded into the POP3it_Attachments table, the POP3it_UIDL field will contain the UIDL (Unique ID Listing, i.e. an email’s ID) of the email that it is attached to. This relationship between the two UIDL fields allows you to see the attachment records that are related to each email.
In conclusion, downloading email with POP3it Pro is as simple as creating a couple tables and fields, and then calling the POP3it_CheckAccount function after creating an account in the Account configuration dialog.
###Helper Scripts
The rest of the scripts in this example database are simply for manipulating the email after it has been downloaded. In other words, how you interact with the email data and how it is displayed. These are not required to simply download email, but they are what make the example more like a normal email client. We are going to look at the following scripts:
Go To Message
View As
ShutdownNote, the scripting below is written to work with many versions of FileMaker (7, 8, 8.5, 9, 10, and etc). Because of this, there is a lot of extra scripting logic to work differently in each version of FileMaker. Your database may not need all of this scripting if you know exactly which versions of FileMaker you will be working in. Removing unnecessary script steps will make the script much more clean and be easier to understand.###Go To Message
The Go To Message script is used to navigate between emails by going to the Next or Previous records in the database. Look at the "Go To Message" script by opening ScriptMaker/Manage Scripts and editing the script.
If [ Get ( ScriptParameter ) = “Previous” ]The script starts by checking the Script Parameter that was passed to the script. The Script Parameter determines if the script displays the Next email or the Previous email. The Script Parameter is defined on the Next and Previous buttons located on the Text and HTML Details layouts.
Go to Record/Request/Page [ Previous; Exit after last ]If the Script Parameter was "Previous", the Go To Record script step is used to go to the Previous record.Else If [ Get ( ScriptParameter ) = “Next” ] Go to Record/Request/Page [ Next; Exit after last ] End IfIf the Script Parameter was "Next", the Go To Record script step is used to go to the Next record.If [ IsEmpty(POP3it_Messages::POP3it_Body_HTML) ]This checks if the POP3it_Body_HTML field is empty. If the field is empty, there is no HTML body for the current email.If [ Get ( LayoutName ) ≠ “Text Detail” ]Next it checks if the current layout name does not equal “Text Detail”. Basically, this is just checking if we are currently on the Text Detail layout. This was only added because the Go to Layout script step induces many screen flashes on the Windows platform. This is an attempt to reduce the flashing that occurs and make a smoother transition between emails.Freeze Window Go to Layout [ "Text Detail" (POP3it_Messages) ] End IfIf we are currently not on the Text Detail layout, Freeze the window and change to the Text Detail layout.Else If [ Abs (Get ( ApplicationVersion )) ≥ 9 ]If the first If statement was false, in other words, if the current email does have an HTML part, then this script step will be executed. This Else If statement is checking to see what version of FileMaker you are using. If you are using FileMaker 9 or above, this Else If will be true.Set Field [ POP3it_Messages::WebViewer; "data:text/html, " & POP3it_Messages::POP3it_Body_HTML ]This step sets the “WebViewer” field with "data:text/html, " and the HTML data from the current email. The Web Viewer object on the HTML Detail layout uses the data in the “WebViewer” field. The "data:text/html, " part that is added before the HTML code is called the “data protocol”. This means we can load HTML code directly into a web viewer object without the need for a .html file on your local computer. This is supported in FileMaker 9 and above, and makes displaying HTML emails very easy.If [ Get ( LayoutName ) ≠ “HTML Detail” ] Freeze Window Go to Layout [ "HTML Detail" (POP3it_Messages) ] End IfNow that the HTML code has been passed to the Web Viewer object, this If statements checks to make sure we are on the “HTML Detail” layout. If not, it Freezes the window and uses the Go to Layout script step to change layouts.Else If [ Abs (Get ( ApplicationVersion )) ≥ 8.5 ]If you are using FileMaker 8.5, this Else If statement is true. On FileMaker 8.5, we must export the HTML code to a file on your computer. That file is then loaded into the Web Viewer object to allow you to view the HTML email.Set Variable [ $path; Value:Let( […etc]) ]This Set Variable is creating a path to export the HTML to a file. The format of this path is determined by FileMaker’s Export Field Contents script step, which is where this variable is going to be passed to. Let’s look at the calculation in detail, so select the Set Variable script step and click the Specify button. Now click the Specify button next to the Value: field.
Let( [
prefix = “file” & If( Abs( Get ( SystemPlatform) ) = 1; “mac:/” & POP3it_File_GetPath( “Root” ) ; “win:/”)
];
prefix & Substitute( POP3it_File_GetPath( “Chewable” ); “\” ; “/”) & “/POP3it_HTML_Email.htm”
)
You will now have a window titled “Specify Calculation” with this calculation. The goal of this calculation is to create a path to a folder on your computer where we can export a file to. The main part of this calculation is the POP3it_File_GetPath function. This is a function in POP3it Pro that allows you to query the system for different paths that exist. For example, you can get the path to your Desktop or the current user’s documents folder. The POP3it_File_GetPath function returns a path that looks like normal paths on your system. For example:
On Windows:
C:\Folder\file.html

or on Mac:
/folder/file.html
However, FileMaker’s Export Field Contents script step wants the path to be in this format:
On Windows:
filewin:/C:/folder/file.html

or on Mac:
filemac:/Harddrivename/folder/file.html
Because of this, we must modify the path to make it look how the Export Field Contents wants it to.
prefix = “file” & If( Abs( Get ( SystemPlatform) ) = 1; “mac:/” & POP3it_File_GetPath( “Root” ) ; “win:/”)The calculation starts out by checking if you are on Windows or Mac. If on Mac, it uses the POP3it_File_GetPath function to get the “Root” or harddrive name, as the path returned from POP3it_File_GetPath( “Chewable” ) will not contain it. The prefix variable now has a value like this:on Windows: filewin:/
or on Mac: filemac:/Macintosh HDThis is just beginning of the path, as we still need to put it all together.
prefix & Substitute( POP3it_File_GetPath( “Chewable” ); “\” ; “/”) & “/POP3it_HTML_Email.htm”This then adds the prefix variable onto the path returned from POP3it_File_GetPath( “Chewable” ). The Chewable keyword makes the function return the path to a hidden temporary folder on your computer. On Mac, this is a temporary folder that is emptied everytime the computer is started. Unfortunately, there is not such a folder on Windows, so we must delete the file at a later time. We will get into that further in the explanation of the “Shutdown” script.The path that is returned from POP3it_File_GetPath( “Chewable” ), is then put through a Substitute function which changes backslashes into forward slashes. This is done because paths on Windows use backslashes instead of forward slashes. Remember, we are modifying the path to match the format that the Export Field Contents script step requires, and it wants a path with forward slashes.
Finally, we put a filename on the end of the path. When this calculation finishes, we get a path like:
on Windows:
filewin:/C:/DOCUME1/Daniel/LOCALS1/Temp/POP3it_HTML_Email.htm

or on Mac:
filemac:/HD/private/var/folders/Yb/YbCglBueFO05B4Cj8EZKV++++TI/Cleanup At Startup/POP3it_HTML_Email.htm
Both of these paths are to hidden folders, so they cannot normally be found. On Windows you will have to use the option to display hidden files and folders in order to browse to the folder. On Mac, the only way to browse to this folder is to use the Go menu in the Finder, and then click “Go to Folder”. You can then copy and paste the path into the dialog to open the folder. All of this is only necessary if you want to actually see where the script is putting the file. Note, these temporary folder paths are specific to your computer, so copying and pasting the paths above will not work. If you want to browse to the folder on your own computer, you will need to call the POP3it_File_GetPath( “Chewable” ) function and get the path that is returned from it.
Now that we have looked over the calculation, close the “Specify Calculation” window and the Set Variable Options dialog, and go back to the script.
Our $path variable now has the path we want to export the .html file to, and it is in the format the Export Field Contents likes.
Export Field Contents [ POP3it_Messages::POP3it_Body_HTML; “$path” ]Now we actually call Export Field Contents to export the data from the POP3it_Body_HTML field to the path that is specified in the $path variable.If [ Get ( LastError ) = 800 ] Set Field [ POP3it_Messages::Result; "Attempted to export the HTML to this path: " & $path ] Show Custom Dialog [ Title: “Error”; Message: “An error occured…”; Buttons: “OK” ] End IfThis checks to see if an error occurred with the Export. If it did, we set the Results field with some information and show a dialog to tell the user about it.Set Field [ POP3it_Messages::WebViewer; Let( [ prefix = “file://”…) ]Here we set the WebViewer field with the path to the .html file. Much like the Set Variable calculation above, we have to create a path that will work correctly with the web viewer object. This path is easier to create because we are simply working with paths that are native to the operating system, instead of a strange format like the Export Field Contents uses. Since we are dealing with a file on our local computer and not a URL to a website, we add “file://” to the beginning of the path. We then get the path from the POP3it_File_GetPath function, add a forward slash or backslash to the path depending on the operating system, and then place the filename at the end of the path.Set Web Viewer [ Object Name: “Web”; Action: Reload ]This step reloads the web viewer object to make sure we are looking at the most recent version of the file. Since we are simply overwriting the same .html file for each email, we must reload the web viewer or it will not change between emails. This is not necessary when working with the data protocol and FileMaker 9/10.If [ Get ( LayoutName ) ≠ “HTML Detail” ] Freeze Window Go to Layout [ “HTML Detail” (POP3it_Messages) ] End IfAgain, if we are not already on the HTML Detail layout, this Freezes the window and changes to the correct layout.Else If [ Get ( LayoutName ) ≠ “Text Detail” ] Freeze Window Go to Layout [ “Text Detail” (POP3it_Messages) ] End If End IfFinally, if the script gets to this part, this means the email does contain an HTML part, but you are using FileMaker 7 or 8. The web viewer object does not exist in FileMaker 7/8, so we cannot display the email directly in FileMaker. Because of this, we simply Freeze the window and go to the Text Layout.###View As
The View As script is used to switch between the Text and HTML portions of an email. Look at the "View As" script by opening ScriptMaker/Manage Scripts and editing the script.
If [ Get ( ScriptParameter ) = “Text” ]The script starts out by checking if the Script Parameter was Text. This same script is used to toggle between the Text and HTML portions of the email, so we must check to see which one the user is wanting.If [ IsEmpty(POP3it_Messages::POP3it_Body_Text) ]Next, we check to see if the email has a Text portion by using the IsEmpty function on the POP3it_Body_Text field.Show Custom Dialog [ Title: “Error”; Message: “This message does not contain a Text part.”; Buttons: “OK” ]If the field is empty, this displays a dialog to the user telling them the email does not have a Text part.Else Go to Layout [ “Text Detail” (POP3it_Messages) ] End IfIf the field is not empty, then this changes to the Text Detail layout.Else If [ Get ( ScriptParameter ) = “HTML” ]If the Script Parameter was not Text in the original If statement, then we check if it was set to “HTML”.If [ IsEmpty(POP3it_Messages::POP3it_Body_HTML) ]We then check to make sure the HTML field is not empty using the IsEmpty function.Show Custom Dialog [ Title: “Error”; Message: “This message does not contain a HTML part.”; Buttons: “OK” ]If the field is empty, this displays a dialog to the user telling them the email does not have an HTML part.Else If [ Abs (Get ( ApplicationVersion )) ≥ 8.5 ] Go to Layout [ “HTML Detail” (POP3it_Messages) ]Next we check what version of FileMaker is being used. If FileMaker 8.5 or above, simply go to the HTML Detail layout. Because the “Go To Message” script always defaults to display HTML and passes it to the web viewer if it exists, this means it is already in the web viewer, and we simply need to go to the layout.Else If [ Abs (Get ( ApplicationVersion )) ≥ 8 ]This checks if the version of FileMaker is 8 or higher.Set Variable [ $path; Value:Let( […) ]This Set Variable script step creates a path to pass to the Export Field Contents script step. This works just the same as the Set Variable step in the Go To Message script.Export Field Contents [ POP3it_Messages::POP3it_Body_HTML; “$path” ]Now we call Export Field Contents to export the data from the POP3it_Body_HTML field to the path that is specified in the $path variable.Else Export Field Contents [ POP3it_Messages::POP3it_Body_HTML; “file:POP3it_HTML_Email.htm” ] End IfThis part means we are using FileMaker 7, so export the HTML to “file:POP3it_HTML_Email.htm”. This is a path that is relative to the location of the example database file. In other words, the HTML file will be created in the same folder that this example database resides in. This is done in FileMaker 7 because the Set Variable script step did not exist (was not added until FileMaker 8), and there was no other way to pass a dynamic path to the Export Field Contents script step.If [ Get ( LastError ) = 800 ] Set Field [ POP3it_Messages::Result; “Attempted to export the HTML to this….” ] Show Custom Dialog [ Title: “Error”; Message: “An error occured…”; Buttons: “OK” ] End IfThis checks to see if an error occurred with the Export. If it did, we set the Results field with some information and show a dialog to tell the user about it.Open URL [ Let( [ prefix = file… ) ] [ No dialog ] End If End If End IfFinally, we use the Open URL script step to open the .htm file in the operating system’s default web browser. The path to the file is calculated just like we have done previously. Note, if you look at the calculation, you will notice the path when working with FileMaker 8 is from POP3it_File_GetPath( “Chewable” ), whereas when working in FileMaker 7 it is from POP3it_File_GetPath( “database”).The Shut Down script is used to do some clean up when the database closes. The script is set to be performed when the file is closed in the database file options. Look at the "Shutdown" script by opening ScriptMaker/Manage Scripts and editing the script.
If [Abs (Get ( ApplicationVersion )) < 9]This checks if the version of FileMaker is less than nine. Since we are only creating actual files on the hard drive for FileMaker 7/8/8.5, there is no need to perform the task in FileMaker 9 and above.Set Field[ POP3it_Messages::Result; Let( [ prefix = …]) ] End IfThe Set Field script step uses the POP3it_File_Delete function to delete the .htm file we previously created. By only using one .htm file and overwriting it for each email, this makes the clean up simple as we only have to delete one file. The path to the file is calculated just like before, and then it is simply passed to the POP3it_File_Delete function. You can click the Specify button next to Calculated Result to see the calculation used to delete the file.How to recreate in your solution
After you have gone over the example databases, learned how they work and how the plug-in works, you can integrate the plug-in into your own solutions. There are many ways this can be done, but here are a few of the most common ways.
Note, to properly integrate the plug-in into your own solution you need to be proficient at FileMaker scripting and calculations. While our documentation tries to provide some tips, teaching all the ins and outs of FileMaker scripting and calculations is beyond what we do. FileMaker offers many training options to help you further your FileMaker developing skills. If you are looking for a professional developer to integrate the plug-in into your solution, you can search for one on FileMaker's Consultants site.Import example script
This is the easiest way to go, but can be the most frustrating at the same time. When importing a script, you will have to go back over the imported script with a fine tooth comb. Field references will be different between the example database and your own database, so you will have to touch every script step to make sure all field references are correct. This will mainly deal with the Set Field script step (but check all the script steps to make sure they are correct for your database). Select the Set Field step and check the “Specify target field” button to make sure that field is correct. Then check the “Calculated result” button and make sure any field (and table names) are correct. If you find /* */ at the beginning and end of the calculation, FileMaker has commented out the code because of incorrect field references. You will need to fix all field references, and then remove the /* */ from the beginning and the end.
Re-create example script
Print out or view the example script and re-create it in your own database. Since you will be creating the script as you go, you are less likely to overlook an incorrect field reference as you would with Importing an example script. This method helps you to better understand what your script is doing since you are actually creating the script yourself.
Create script from scratch
If you went over all the example databases, you should have a pretty good idea what a script would look like. Using the function browser to give you more information about the functions, you can create a script to send an email exactly as you need it. Click the “Functions” tab to open the function browser. Remember to build error checking into your scripts. This is very important and will save much frustration later when something stops working and you have no idea why and no errors to go by.
Be sure to check out the Coding Considerations section for some helpful tips on working with the plug-in functions and writing scripts.