Introduction
-
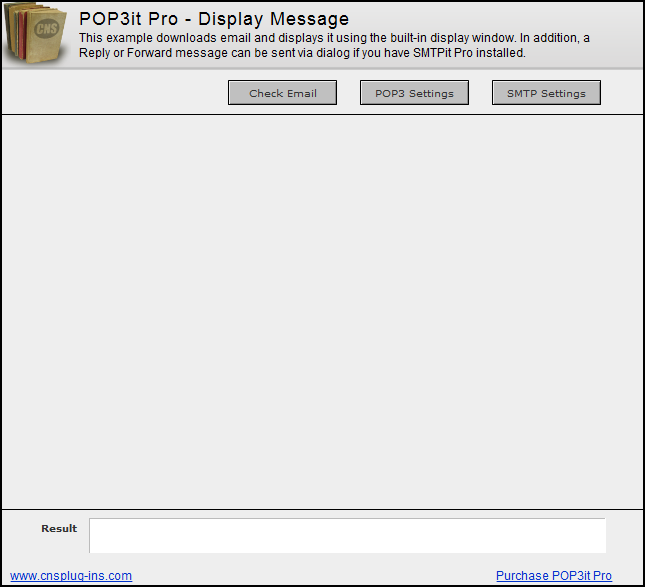
This example demonstrates a simple way to view email that has been received into a database with POP3it Pro. In addition, a Reply or Forward message can be sent via a window if you have SMTPit Pro installed.
Download Example File
Account Setup
In order to connect to Mail Servers, you need to set up accounts for them. Click the “Account Setup” button which calls the “Edit Accounts” script. This script opens the Account Configuration Dialog using the POP3it_ConfigureAccount function.
Need more information about working with accounts or how to automate account creation?
See the Account Configuration section of the documentation for more information.At the top of this dialog, you will see a list of Account Names. If you have not created a new account yet, press the “+” button.
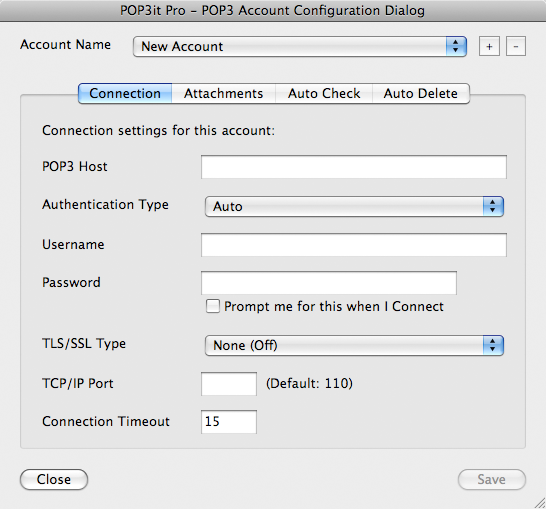
- The POP3 Host is the full domain name or IP address of the Mail Server you want to connect to.
- The Authentication Type is the type of authentication your Mail Server requires, if applicable.
- The Username and Password are what you need to connect to the Server. If you don’t want to store your Password, you can optionally click the “Prompt me for this when I Connect” checkbox to have the plug-in ask you each time.
- If your Mail Server requires SSL/TLS connections, you can adjust that setting.
- The TCP/IP Port field is where you define an alternate port to connect on. Leaving this field blank uses the default port 110.
- Finally, the Connection Timeout lets you define how long POP3it Pro should wait for a response from your Mail Server before giving up.
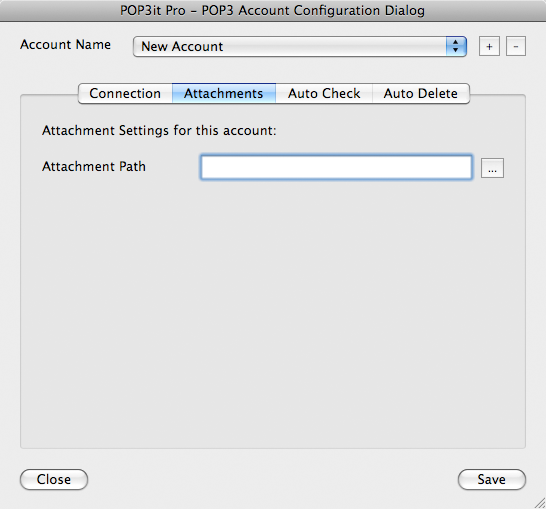
On this tab, you can specify the location of where the plug-in should download attachments that are in your email. If your email contain any embedded or inline attachments, they will be put in a folder called “Inline” which can be found inside the Attachments folder.
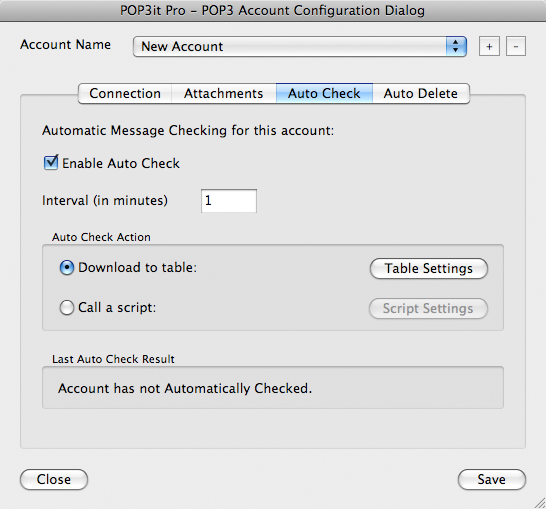
This tab allows you to turn on Auto Check. Auto Check will check your email account on an interval you specify.
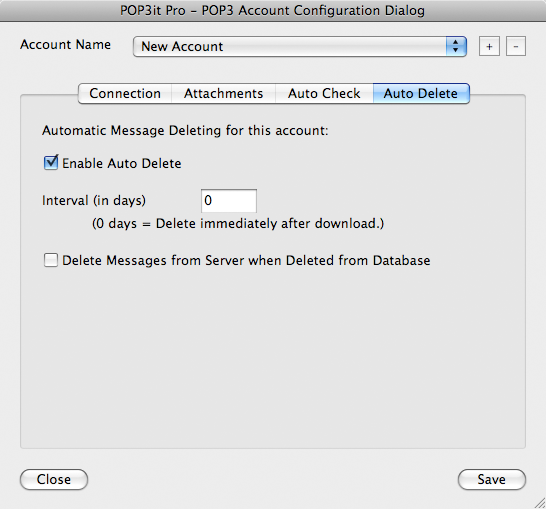
On this tab, you can specify if the plug-in should delete email off your mail server. You can specify the number of days the plug-in should wait before deleting email off the mail server.
Click the Save button, and then the Close button when you are finished adding accounts.
If you have SMTPit Pro installed, you can also enter the settings for it by clicking the SMTP Settings button. SMTPit Pro is only required if you want to send reply/forward emails.
Download Email
When you are ready to download your email, click the Check Email button. This will download email from all accounts set in the Account configuration dialog. Other examples will allow you to specify exactly what Accounts to download from, but for this example it will download email from all defined Accounts. A new record will be created for each email. When the plug-in is done downloading email, click on an email to view it. A Message Window will appear displaying the email in much the same way a normal email client displays an email to a user. The Message Window includes buttons to go to the next and previous email, reply, forward, delete, and print the email. If an email has attachments you can save them using the controls that appear on the bottom of the Message Window.
View Results
This example has a Result field where the plug-in Results are shown. This is where the plug-in can give you feedback on what it is doing. If an error occurs, it will report the error in the results field which can help you fix any issues you may be having. It will also report its successes so that you know everything is going as planned.
To determine which field contains the plug-in results, look at the script you are using to call the plug-in. The script will contain Set Field script steps which are how the plug-in is called. For example, the “Edit Settings” script contains a Set Field script step that looks like:
Set Field [ POP3it_Messages; POP3it_ConfigureAccount ]The Target field of the Set Field script step is the “POP3it_Messages” field, which is how the “Result” field is determined as what will hold the feedback from the plug-in.
Access the Plug-in
When using plug-ins (not just ours), they do not add new script steps, but instead add new functions that are available in the calculation engine.
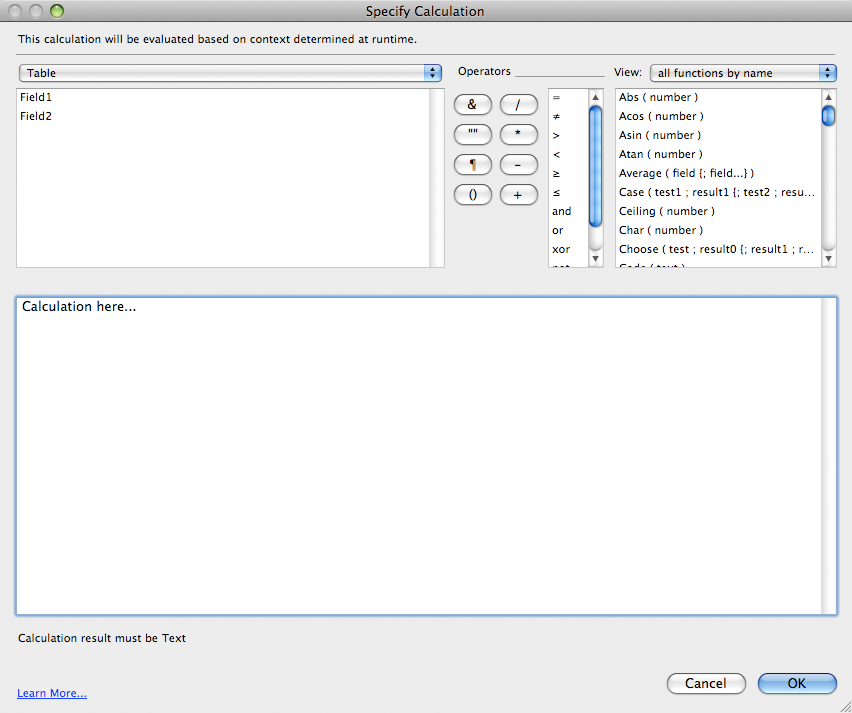
To see a calculation that tells the plug-in what to do, go to the “Scripts” menu, choose “ScriptMaker” or “Manage Scripts”. Next, double click the script you want to view. Note that we are using the “Set Field” script step which consists of two settings. The “Specify target field” button allows you to choose which field you want to set. In our case we want to set the “Result” field. The second specify button is where the POP3it Pro calculation exists. Click this button to see the calculation that is used to tell the plug-in what to do.
The “Specify Calculation” window as shown in the image above is found in many different places in FileMaker. The most common places to use the plug-in is within the "Set Field or “Set Variable” script/button steps.
In FileMaker’s “Specify Calculation” window, the plug-in is accessed using the “POP3it_FunctionName” functions. To find a list of these in FileMaker, click “View” menu in the top right corner of a “Specify Calculation” window, select “External Functions”, and then scroll through the list until you find the plug-in name. There are many functions available that allow you to do a variety of different things. For a complete listing of the functions and help for each one, see the Functions tab of the POP3it Pro Knowledge Base.
Script Explanation
To understand how this example works, open ScriptMaker/Manage Scripts and edit the Check Email script.
###Check Email script
Set Field[POP3it_Messages::Result; POP3it_CheckAccount]All the script does is call the POP3it_CheckAccount function which starts the download process. This function is the equivalent to the “Check Email” or “Get New Messages” button in a normal email client. You can read more about how this download process works in the “Receive Email” example.
Click on the Ok button to close the Check Email script, and then edit the Go To Message Script.
###Go To Message script
This script displays and controls the Email Window for viewing the email.
Loop
Set Field [ POP3it_Messages::Result; POP3it_DisplayMessage( POP3it_Messages::POP3it_FullSource )]
This first script step calls the POP3it_DisplayMessage function which is what makes the Email Window display. The parameter of the function takes the full source of an email, which the plug-in downloaded into the POP3it_Messages::POP3it_FullSource field for each email. The script pauses at this step when the Email Window is open, so it will not continue until a button on the Email Window is clicked. When the user clicks a button on the Email Window, it will return to the script with the name of the button that was clicked. The script can then respond accordingly, possibly looping back to the top to call POP3it_DisplayMessage again with the next email.
 If[POP3it_Messages::Result = “Previous”]
Go To Record/Request/Page [Previous; Exit After Last]
This script step goes to the previous record if the Previous (“<”) button is clicked.
 Else If[POP3it_Messages::Result = “Next”]
Go To Record/Request/Page [Next; Exit After Last]
If the Next (“>”) button is clicked this goes to the next record.
 Else If[POP3it_Messages::Result = “Reply” or POP3it_Messages::Result = “Forward”]
Perform Script [“Reply/Forward”]
This script step performs the Reply/Forward script if the Reply or Forward button is clicked. Click on the Ok button to close the Go To Message script, and then edit the Reply/Forward Script.
###Reply/Forward script
If[SMTPit_Version = “?”]
Show Custom Dialog[“Error”; “SMTPit Pro does not appear to be installed…”]
The script starts out by checking to see if SMTPit Pro is installed, since it will be required to send a reply or forward email.
Else
If[IsEmpty( POP3it_Messages::SMTPit_Host )]
This checks to make sure the user has entered the hostname for the mail server. This step just helps catch simple mistakes.
  Show Custom Dialog[“Error”; “”You must specify your SMTP host…“]
Perform Script[”Edit SMTPit Pro Settings"]
Halt Script
If the hostname is blank, this gives the user an error message, opens the SMTP Settings window, and then halts the script.
 Else
If[POP3it_Messages::Result = “Reply”]
Set Field[POP3it_Messages::Result; SMTPit_Clear & “¶” & SMTPit_SetSubject(…]
If the Reply button was clicked, this script step is used to start setting up the reply message. Select the Set Field script step and click the Specify… Calculated Result: button.
    SMTPit_Clear & “¶” &
SMTPit_SetSubject( "Re: " & POP3it_Messages::POP3it_Header_Subject ) & “¶” &
SMTPit_SetTo( POP3it_Messages::POP3it_Header_From )
This calculation starts by clearing any previous settings in SMTPit Pro with the SMTPit_Clear function. The subject of the message is then set from the POP3it_Messages::POP3it_Header_Subject field with "Re: " prefixed to it. The To address is then set using the address in the POP3it_Messages::POP3it_Header_From field. Click Ok to continue looking at the script.
  Else If[POP3it_Messages::Result = “Forward”]
Set Field[POP3it_Messages::Result; SMTPit_Clear & “¶” & SMTPit_SetSubject(…]
Likewise, if the Forward button was clicked, this script step is used to start setting up the forward message. Select the Set Field script step and click the Specify… Calculated Result: button.
    SMTPit_Clear & “¶” &
SMTPit_SetSubject( "Fwd: " & POP3it_Messages::POP3it_Header_Subject ) & “¶” &
This calculation starts by clearing any previous settings in SMTPit Pro with the SMTPit_Clear function. The subject of the message is then set from the POP3it_Messages::POP3it_Header_Subject field with "Fwd: " prefixed to it. The To address is not set because the user will choose who to send the message to. Click Ok to continue looking at the script.
  End If
Set Field[POP3it_Messages::Result; Let ([…]
This step sets up the rest of the email and sends it. Select the Set Field script step and click the Specify… Calculated Result: button.
   Let ([
 source = POP3it_Adv_ConnectFile( POP3it_Messages::POP3it_FullSource );
 first = POP3it_Adv_GoToMessage( “First” );
 body = POP3it_Adv_GetBody( “Text” )
];
The calculation starts out by setting some variables inside a Let statement. The “source” variable uses the POP3it_Adv_ConnectFile to make a “connection” to the full source of the current email. This allows us to pull data out of the email. The “first” variable then uses the POP3it_Adv_GoToMessage function which is required when using POP3it_Adv_ConnectFile. The POP3it_Adv_ConnectFile function mimics how you would connect to a real mail server and download email using the plug-in (e.g. connect, go to the first email, download/extract data, go to next email, etc). Since the plug-in is now “connected” to the fullsource of the current email, we use the POP3it_Adv_GetBody function to set the “body” variable to the text body of the email (this is done by specifying the “Text” parameter in the function).
   SMTPit_SetHost( POP3it_Messages::SMTPit_Host ) & “¶” &
SMTPit_SetAuthentication( POP3it_Messages::SMTPit_Authentication Type; POP3it_Messages::SMTPit_Username;
POP3it_Messages::SMTPit_Password; POP3it_Messages::SMTPit_UseSSL) & “¶” &
This part sets the hostname using the data from the POP3it_Messages::SMTPit_Host field, and similarly the Authentication from the respective fields.
SMTPit_SetBody( POP3it_QuoteMessage( body ); “Text”) & “¶” &This part sets the body of the email, but first the text body is modified with the POP3it_QuoteMessage function. This function will take the text body and “Quote” it like an Email Client “Quotes” Text when you reply/forward an email. In other words, it will add > at the beginning of each line to indicate that someone else wrote that original Text.
   SMTPit_SetFrom( POP3it_Messages::SMTPit_From ) & “¶” &
SMTPit_SendWithDialog( “Advanced”; “”; “”; “”; “”; POP3it_Messages::SMTPit_GetTranscript; “True”)
Finally, the From address is set with the data in the POP3it_Messages::SMTPit_From field, and then the SMTPit_SendWithDialog function makes an Email Window appear to allow the user to complete and send the reply/forward email. Click Ok to continue looking at the script.
Set Field[POP3it_Messages::Result; POP3it_Adv_Disconnect…]This step disconnects from the full source. Select the Set Field script step and click the Specify… Calculated Result: button.
   POP3it_Adv_Disconnect & “¶” &
POP3it_Messages::Result
The POP3it_Adv_Disconnect function “disconnects” the plug-in from the full source just as you would if it was connected to a real mail server. The data already in the POP3it_Messages::Result field is then appended so it is not overwritten. Click Ok twice and then edit the Go To Message Script.
###Go To Message script continued
 Else If[POP3it_Messages::Result = “Delete”]
Set Error Capture [On]
Delete Record/Request[]
Set Error Capture [Off]
End If
Going back to the original received email window. If the delete button was clicked, this would turn error capture on, show a dialog asking if the use wanted to delete the record, and then turn error capture back off. Error capture was turned on because if the user decided not to delete the record by clicked Cancel, FileMaker would ask if you wanted to continue the script. By turning error capture on, this message is suppressed. The script then turns error capture back off because if it was not turned off any future FileMaker messages would also be suppressed and never seen.
 Exit Loop If[IsEmpty(POP3it_Messages::Result)]
End Loop
Finally, the loop exits if the user closes the Email Window. When the Email Window is closed, the POP3it_DisplayMessage function will return a result of nothing to the POP3it_Messages::Result field, so this Exit Loop If statement checks to see if the field is empty.
How to recreate in your solution
After you have gone over the example databases, learned how they work and how the plug-in works, you can integrate the plug-in into your own solutions. There are many ways this can be done, but here are a few of the most common ways.
Note, to properly integrate the plug-in into your own solution you need to be proficient at FileMaker scripting and calculations. While our documentation tries to provide some tips, teaching all the ins and outs of FileMaker scripting and calculations is beyond what we do. FileMaker offers many training options to help you further your FileMaker developing skills. If you are looking for a professional developer to integrate the plug-in into your solution, you can search for one on FileMaker's Consultants site.Import example script
This is the easiest way to go, but can be the most frustrating at the same time. When importing a script, you will have to go back over the imported script with a fine tooth comb. Field references will be different between the example database and your own database, so you will have to touch every script step to make sure all field references are correct. This will mainly deal with the Set Field script step (but check all the script steps to make sure they are correct for your database). Select the Set Field step and check the “Specify target field” button to make sure that field is correct. Then check the “Calculated result” button and make sure any field (and table names) are correct. If you find /* */ at the beginning and end of the calculation, FileMaker has commented out the code because of incorrect field references. You will need to fix all field references, and then remove the /* */ from the beginning and the end.
Re-create example script
Print out or view the example script and re-create it in your own database. Since you will be creating the script as you go, you are less likely to overlook an incorrect field reference as you would with Importing an example script. This method helps you to better understand what your script is doing since you are actually creating the script yourself.
Create script from scratch
If you went over all the example databases, you should have a pretty good idea what a script would look like. Using the function browser to give you more information about the functions, you can create a script to send an email exactly as you need it. Click the “Functions” tab to open the function browser. Remember to build error checking into your scripts. This is very important and will save much frustration later when something stops working and you have no idea why and no errors to go by.
Be sure to check out the Coding Considerations section for some helpful tips on working with the plug-in functions and writing scripts.

