Download Example File
Introduction
Account Setup
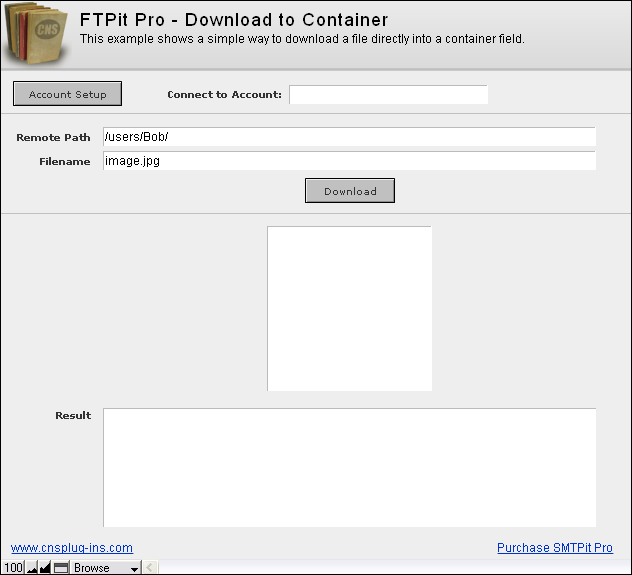
In order to connect to FTP Servers, you need to set up accounts for them. Click the “Account Setup” button which calls the “Edit Accounts” script. This script opens the Account Configuration Dialog using the FTPit_ConfigureAccount function.
Need more information about working with accounts or how to automate account creation?
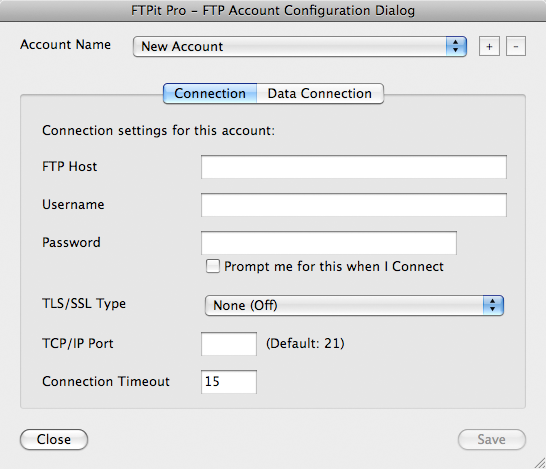
See the Account Configuration section of the documentation for more information.At the top of this dialog, you will see a list of Account Names. If you have not created a new account yet, press the “+” button.
- The FTP Host is the full domain name or IP address of the FTP Server you want to connect to.
- The Username and Password are what you need to connect to the Server. If you don’t want to store your Password, you can optionally click the “Prompt me for this when I Connect” checkbox to have the plug-in ask you each time.
- If your FTP Server requires SSL/TLS connections, you can adjust that setting. Typically the “After Connect” setting would be used if your FTP Server requires you to connect on the default TCP/IP Port 21. Alternatively, if your FTP Server requires you to connect on an alternate TCP/IP Port, the “Before Connect” setting would be used. This may vary depending on the FTP Server.
- The TCP/IP Port field is where you define an alternate port to connect on. Leaving this field blank uses the default port 21.
- Finally, the Connection Timeout lets you define how long FTPit Pro should wait for a response from your FTP Server before giving up.
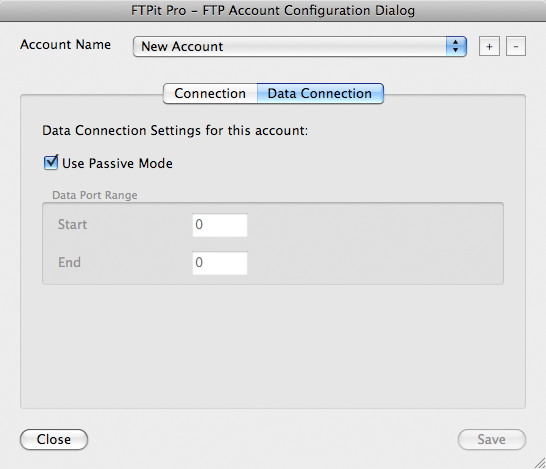
On this tab, you can specify whether or not you need to connect to your FTP Server with Passive connections. This setting is on by default because most people are behind firewalls and you typically need to use Passive Mode when you are behind a firewall. Unchecking the “Use Passive Mode” checkbox enables the Data Port Range settings. Again, these settings help you configure the plug-in for use behind a firewall. Your firewall documentation should help you in configuring these settings.
Access the Plug-in
When using plug-ins (not just ours), they do not add new script steps, but instead add new functions that are available in the calculation engine.
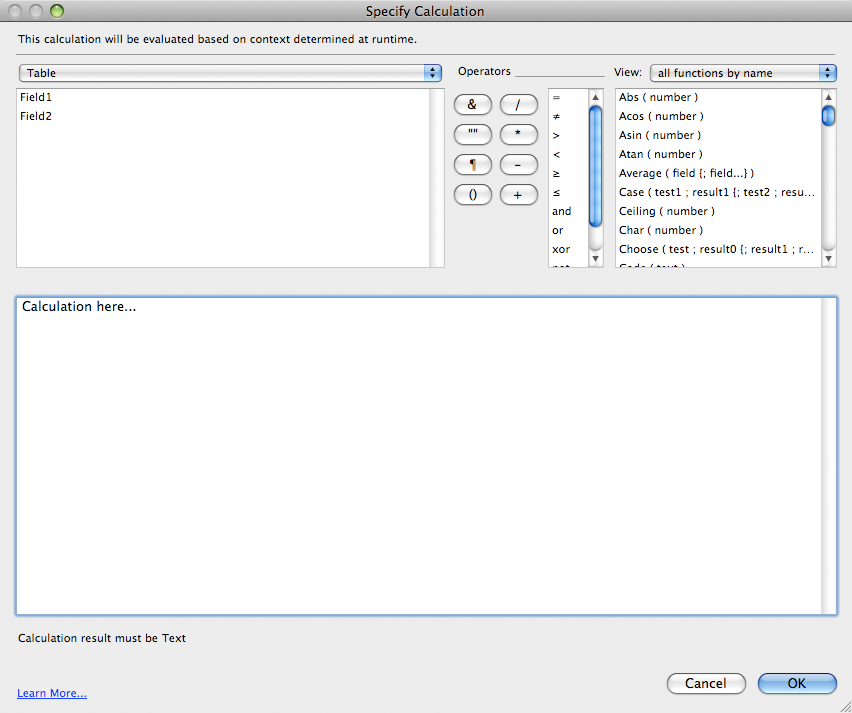
To see a calculation that tells the plug-in what to do, go to the “Scripts” menu, choose “ScriptMaker” or “Manage Scripts”. Next, double click the script you want to view. Note that we are using the “Set Field” script step which consists of two settings. The “Specify target field” button allows you to choose which field you want to set. In our case we want to set the “Result” field. The second specify button is where the FTPit Pro calculation exists. Click this button to see the calculation that is used to tell the plug-in what to do.
The “Specify Calculation” window as shown in the image above is found in many different places in FileMaker. The most common places to use the plug-in is within the "Set Field or “Set Variable” script/button steps.
In FileMaker’s “Specify Calculation” window, the plug-in is accessed using the “FTPit_FunctionName” functions. To find a list of these in FileMaker, click “View” menu in the top right corner of a “Specify Calculation” window, select “External Functions”, and then scroll through the list until you find the plug-in name. There are many functions available that allow you to do a variety of different things. For a complete listing of the functions and help for each one, see the Functions tab of the FTPit Pro Knowledge Base.
View Results
This example has a Result field where the plug-in Results are shown. This is where the plug-in can give you feedback on what it is doing. If an error occurs, it will report the error in the results field which can help you fix any issues you may be having. It will also report its successes so that you know everything is going as planned.
To determine which field contains the plug-in results, look at the script you are using to call the plug-in. The script will contain Set Field script steps which are how the plug-in is called. For example, the “Edit Accounts” script contains a Set Field script step that looks like:
Set Field [ FTP::Result; FTPit_ConfigureAccount ]The Target field of the Set Field script step is the “FTP::Result” field, which is how the “Result” field is determined as what will hold the feedback from the plug-in.
Transfer Script
To understand how the example scripting works, open ScriptMaker/Manage Scripts and edit the Transfer script.
Set Field [ FTP::Result; “” ]The script starts by clearing the FTP::Result field. This is not required, but helps to verify the results are from the most recent interaction with the plug-in.
If [ IsEmpty(FTP::CurrentAccount) ]This step checks to see if the CurrentAccount field is blank. This step just helps catch simple mistakes, because this example database requires you to select an Account name to connect to.
 Show Custom Dialog [ Title: “Error”; Message: "The "Connect to Account" field…
Exit Script [ ]
End If
This displays an error to the user and exits the script.
Perform Script [ " Status Dialog"; Parameter: “Show” ]This step calls the “Status Dialog” script with a parameter of “Show”. Close the “Transfer” script and edit the “Status Dialog” script.
 Set Field [ FTP::Result;
Let ( xtime = Get ( CurrentTime ) & " "; xtime & Substitute( FTPit_StatusWindow( Get ( ScriptParameter ) ); “¶”; “¶” & xtime ) & “¶” & FTP::Result )]
This step calls the FTP_StatusWindow function. This script was written to work for both Showing and Hiding the Status Window using only one script. This is done by using script parameters. When the script is called a couple steps back, the script parameter was set to “Show”. This script parameter value is retrieved using this FileMaker function:
Get ( ScriptParameter )Since the Get ( ScriptParameter ) function is inside the FTPit_StatusWindow function, the “Show” value is passed to the “Action” parameter of the FTPit_StatusWindow function, and the Status Window is opened. Later in the “Transfer” script we will call the “Status Dialog” script again, but it will be with the “Hide” parameter which will make this same calculation close the Status Dialog. Note, the Let statement is not required to do this, as it simply helps format the data returned from the FTPit_StatusWindow function. FileMaker’s Get ( CurrentTime ) function is used to get the current time and create a log in the Results field. The following calculation would work as well, but it would not format the data returned from the plug-in’s function.
FTPit_StatusWindow( Get ( ScriptParameter ) )This piece of code would achieve the same thing, but the data returned from the FTPit_StatusWindow function would not be formatted to follow the log structure the scripts in the database follow. Having the additional formatting on the data returned makes it easier to read the information in the Result field.
Getting back to the script, close the “Status Dialog” script, and edit the “Transfer” script again.
Set Field [ FTP::Result; Get ( CurrentTime ) & " " & FTPit_Connect( FTP::CurrentAccount ) & “¶” & FTP::Result ]This step calls the FTPit_Connect function to connect to the FTP server and gets the Account name to connect to from the FTP::CurrentAccount field. This calculation also includes FileMaker’s Get ( CurrentTime ) function to stay with the log structure in the Result field. In addition, this Set Field step includes a reference to itself. By including “FTP::Result” in the calculation, the field appends data onto the data that already exists in the field. If this was not included in the calculation, the result from the FTPit_Connect function would overwrite any data that already existed in the Result field. The script appends to the field to make sure no errors are accidentally lost.
If [ PatternCount(FTP::Result; “ERROR:”) > 0 ]This If statement checks the Result field for “ERROR:”, which is the syntax the plug-in will always return errors in. This uses the FileMaker function PatternCount, which will check a piece of data for the existence of a word or phrase. In this case it is checking the FTP::Result field to see if there are any occurrences of “ERROR:”. If this phrase does exist in the field, the PatternCount function will return the number of times it exists. So, anything over zero will make the If statement true, which means an error occurred.
 Show Custom Dialog [ Title: “Error”; Message: “There was an error…”; Buttons: “OK” ]
Perform Script [ " Status Dialog"; Parameter: “Hide” ]
Exit Script [ ]
End If
If an error occurred, this will show an error to the user, call the “Status Dialog” script to hide the Status Dialog, and exit the script.
Set Field [ FTP::Result;
Get ( CurrentTime ) & " " & FTPit_ChangeRemoteDir( FTP::RemotePath ) & “¶” & FTP::Result ]
This step calls the ChangeRemoteDir function to change the current directory we are looking at on the FTP server.
If [ PatternCount(FTP::Result; “ERROR:”) > 0 ]As before, we check for errors in the Result field
 Perform Script [ " Disconnect" ]
Perform Script [ " Status Dialog"; Parameter: “Hide” ]
Show Custom Dialog [ Title: “Error”; Message: “There was an error…”; Buttons: “OK” ]
Exit Script [ ]
End If
If an error occurred, we call the Disconnect script to disconnect from the FTP server, call the “Status Dialog” script to hide the Status Dialog, show an error to the user, and exit the script. The difference between this error checking routine and the first one is that at this point in the script, the plug-in is connected to the FTP server. So, if an error happens we must disconnect from the server before returning control to the user. The plug-in connection to the FTP server will automatically timeout after a period of time, but when possible you should always disconnect from the FTP server.
Set Field [ FTP::Result;
Get ( CurrentTime ) & " " & FTPit_ChangeLocalDir( FTPit_GetLocalNamedPath( “Temporary” ) ) & “¶” & FTP::Result ]
This step sets the local current directory we are going to download the file to using the FTPit_ChangeLocalDir function. Even though we want the file to end up in the container field, there is no way to directly download a file into a container field, so a temporary file must be used and then imported. The FTPit_GetLocalNamedPath function allows you to retrieve different types of paths that are on your system (e.g. Desktop path, Temporary path, etc). This function is used to get the system’s Temporary path, which is passed to the FTPit_ChangeLocalDir function to make the Temporary path the current local path we are working with.
If [ PatternCount(FTP::Result; “ERROR:”) > 0 ]
Perform Script [ " Disconnect" ]
Perform Script [ " Status Dialog"; Parameter: “Hide” ]
Show Custom Dialog [ Title: “Error”; Message: “There was an error changing to the local temporary directory…”; Buttons: “OK” ]
Exit Script [ ]
End If
Again, we check for errors. If an error occurred, the script disconnects, hides the status window, shows the user an error, and exits the script.
Set Field [ FTP::Result; Get ( CurrentTime ) & " " & FTPit_DownloadFile( FTP::Filename) & “¶” & FTP::Result ]The script then calls the FTPit_DownloadFile function to begin the download of the file. The FTP::Filename field contains the name of the file to download, which is passed to the FTPit_DownloadFile function.
If [ PatternCount(FTP::Result; “ERROR:”) > 0 ]
Perform Script [ " Disconnect" ]
Perform Script [ " Status Dialog"; Parameter: “Hide” ]
Show Custom Dialog [ Title: “Error”; Message: “There was an error changing to the local temporary directory…”; Buttons: “OK” ]
Exit Script [ ]
End If
It is very repetitive, but it is import to check for errors. If an error occurred during the download, the script disconnects, hides the status window, shows the user an error, and exits the script.
Perform Script [ " Disconnect" ]
Perform Script [ " Status Dialog"; Parameter: “Hide” ]
If the script made it this far, we have successfully downloaded the file. Since we no longer need the connection to the FTP server, call the Disconnect script to close the connect and then close the Status Dialog. The file is now in a temporary location, so we need to import that into our container field. On to the next step.
Set Field [ FTP::Container; FTPit_ImportContainer( FTPit_GetLocalNamedPath( “Temporary”) & “\” & FTP::Filename) ]This step uses the plug-in’s FTPit_ImportContainer function to import the file from the temporary location into the container field. The plug-in will import the file into the field that is the target of the Set Field step. In this case this is the FTP::Container field. The function requires a full path and filename to import the file, so we use the FTPit_GetLocalNamedPath function again to get the path to the temporary location, and then append the filename on the end of it to create a full path.
If [ PatternCount(FTP::Container; “ERROR:”) > 0 ]This step checks to see if the container field contains “ERROR:”, just as we have done before. Even though it is a container field, it can still contain text, so the PatternCount works.
Set Field [ FTP::Result; Get ( CurrentTime ) & " " & FTP::Container & “¶” & FTP::Result ]If an error occurred, this step copies the error from the container field into the Result field which contains the rest of the result data. This is done to maintain the "log" format of the Result field.
 Show Custom Dialog [ Title: “Error”; Message: “There was an error importing …”; Buttons: “OK” ]
Exit Script [ ]
The If statement continues by disconnecting, closing the status dialog, showing an error dialog, and exiting the script.
Else
Set Field [ FTP::Result; Get ( CurrentTime ) & " " & “Imported '” & FTP::Filename & “' into container field.” & “¶” & FTP::Result ]
End If
If there was no error, the If statement was false, so this script step is run. This simply adds an entry into the "log" to mention the file was imported. This is not a result from the plug-in, but just a normal Set Field script step. This is not required, but just helps maintain the log format in the Result field.
Set Field [ FTP::Result;
Get ( CurrentTime ) & " " & FTPit_DeleteLocalFile( FTPit_GetLocalNamedPath( “Temporary”) & “\” & FTP::Filename )& “¶” & FTP::Result ]
Now that the file has been imported, we need to delete the temporary file, so we use the plug-in’s FTPit_DeleteLocalFile function. Like before, we use the FTPit_GetLocalFile function to get the path to the temporary location and append the filename on the end.
If [ PatternCount(FTP::Result; “ERROR:”) > 0 ]The script checks for errors again in the Result field.
 Show Custom Dialog [ Title: “Error”; Message: “There was an error importing …”; Buttons: “OK” ]
End If
If an error occurred, show an error dialog.
The script then ends and if there were no errors, your file should now be in the container field.
How to recreate in your solution
After you have gone over the example databases, learned how they work and how the plug-in works, you can integrate the plug-in into your own solutions. There are many ways this can be done, but here are a few of the most common ways.
Note, to properly integrate the plug-in into your own solution you need to be proficient at FileMaker scripting and calculations. While our documentation tries to provide some tips, teaching all the ins and outs of FileMaker scripting and calculations is beyond what we do. FileMaker offers many training options to help you further your FileMaker developing skills. If you are looking for a professional developer to integrate the plug-in into your solution, you can search for one on FileMaker's Consultants site.Import example script
This is the easiest way to go, but can be the most frustrating at the same time. When importing a script, you will have to go back over the imported script with a fine tooth comb. Field references will be different between the example database and your own database, so you will have to touch every script step to make sure all field references are correct. This will mainly deal with the Set Field script step (but check all the script steps to make sure they are correct for your database). Select the Set Field step and check the “Specify target field” button to make sure that field is correct. Then check the “Calculated result” button and make sure any field (and table names) are correct. If you find /* */ at the beginning and end of the calculation, FileMaker has commented out the code because of incorrect field references. You will need to fix all field references, and then remove the /* */ from the beginning and the end.
Re-create example script
Print out or view the example script and re-create it in your own database. Since you will be creating the script as you go, you are less likely to overlook an incorrect field reference as you would with Importing an example script. This method helps you to better understand what your script is doing since you are actually creating the script yourself.
Create script from scratch
If you went over all the example databases, you should have a pretty good idea what a script would look like. Using the function browser to give you more information about the functions, you can create a script to send an email exactly as you need it. Click the “Functions” tab to open the function browser. Remember to build error checking into your scripts. This is very important and will save much frustration later when something stops working and you have no idea why and no errors to go by.
Be sure to check out the Coding Considerations section for some helpful tips on working with the plug-in functions and writing scripts.


