Introduction
 Transfer File SE example database
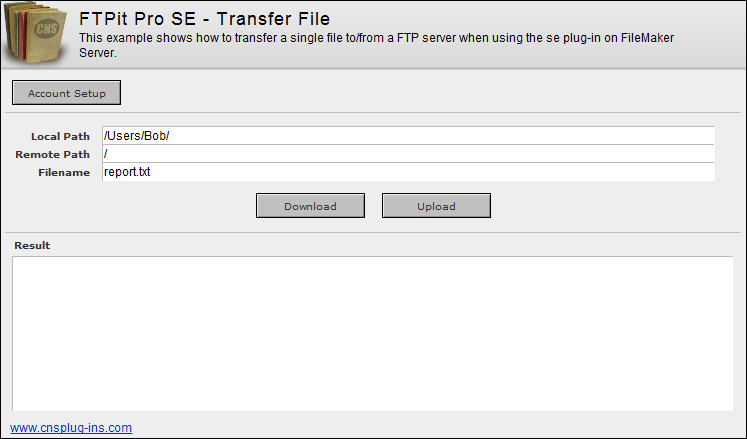
This example shows how to transfer a single file to/from an FTP server using the Server Edition plug-in on FileMaker Server.
Unlike other examples, this example stores the FTP server details in the database instead of using the plug-in’s account configuration. This allows you to use this example on your FileMaker Server without configuring accounts using the “FTPit Pro Server Config.fp7” database.
Download Example File
Test the Database
To properly test this example database, you will need to need to do the following:
- Upload the file to your FileMaker Server
- Open the database in FileMaker Pro via Open Remote
- Click the Settings button and define your FTP Server settings. See the Settings tab for more information.
- In the Local Path field, add the file path to your local file you are transferring. Note, this path must be correct from the perspective of your FileMaker Server, not your local FileMaker Pro computer.
- In the Remote Path field, add the file path to your remote file on the FTP server.
- In the Filename field, add the name of the file you are transferring.
- In the FileMaker Server Admin Console, go to the Schedules tab, and create a new Schedule which runs either the "Upload" or "Download" script
Settings
Before you can transfer files using this database, you will need to enter a few settings. At bare minimum, you will need to enter your FTP Host.

The FTP Host is the full domain name or IP address of the FTP Server you want to connect to.
The TCP/IP Port field is where you define an alternate port to connect on. Leaving this field blank uses the default port 21.
The Username and Password are what you need to connect to the Server.
If your FTP Server requires SSL/TLS connections, you can adjust that setting. Typically the “After Connect” setting would be used if your FTP Server requires you to connect on the default TCP/IP Port 21. Alternatively, if your FTP Server requires you to connect on an alternate TCP/IP Port, the “Before Connect” setting would be used. This may vary depending on the FTP Server.
Timeout lets you define how long FTPit Pro should wait for a response from your FTP Server before giving up.
Passive field allows you to specify whether or not you need to connect to your FTP Server with Passive connections. This setting is on by default because most people are behind firewalls and you typically need to use Passive Mode when you are behind a firewall.
Data Port Range fields are only used when Passive mode is turned off. These settings help you configure the plug-in for use behind a firewall. Your firewall documentation should help you in configuring these settings.
Access the Plug-in
When using plug-ins (not just ours), they do not add new script steps, but instead add new functions that are available in the calculation engine.
To see a calculation that tells the plug-in what to do, go to the “Scripts” menu, choose “ScriptMaker” or “Manage Scripts”. Next, double click the script you want to view. Note that we are using the “Set Field” script step which consists of two settings. The “Specify target field” button allows you to choose which field you want to set. In our case we want to set the “Result” field. The second specify button is where the FTPit Pro calculation exists. Click this button to see the calculation that is used to tell the plug-in what to do.
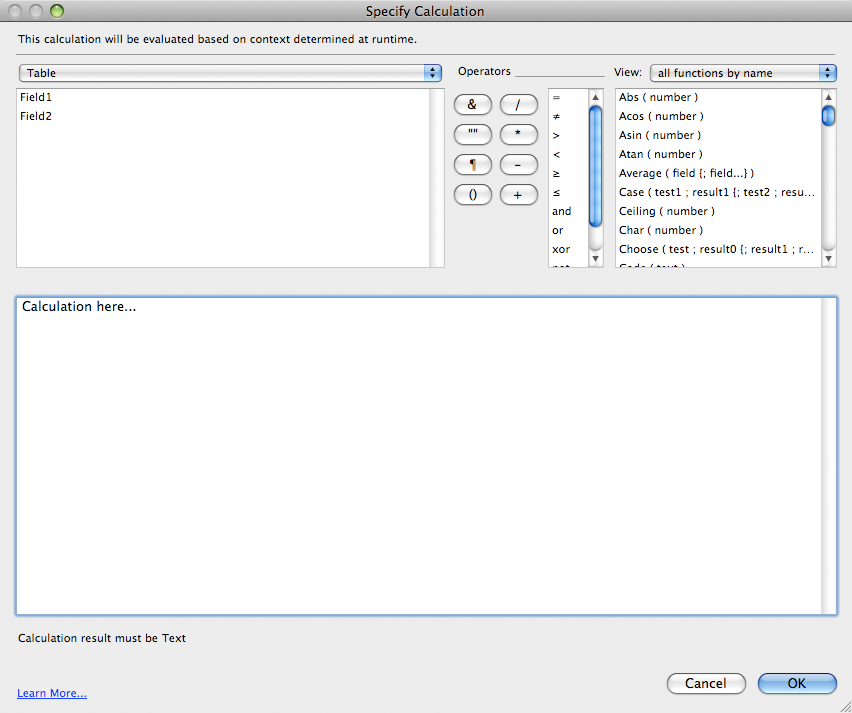
The “Specify Calculation” window as shown in the image above is found in many different places in FileMaker. The most common places to use the plug-in is within the "Set Field or “Set Variable” script/button steps.
In FileMaker’s “Specify Calculation” window, the plug-in is accessed using the “FTPit_FunctionName” functions. To find a list of these in FileMaker, click “View” menu in the top right corner of a “Specify Calculation” window, select “External Functions”, and then scroll through the list until you find the plug-in name. There are many functions available that allow you to do a variety of different things. For a complete listing of the functions and help for each one, see the Functions tab of the FTPit Pro Knowledge Base.
View Results
This example has a Result field where the plug-in Results are shown. This is where the plug-in can give you feedback on what it is doing. If an error occurs, it will report the error in the results field which can help you fix any issues you may be having. It will also report its successes so that you know everything is going as planned.
When running the Server Edition plug-in on the FileMaker Server, it is very important to write results from the plug-in to the database. This is because you cannot sit at the Server and watch the script run or debug it, so errors will potentially be lost. You can still use Set Variable for your function calls if you choose, but make sure your scripting does error checking, and if an error occurs, use a Set Field to write the data to the database.
Set Variable
For example, assume you had a script like the following:
Set Variable [ $result ; FTPit_Connect(“myserver”) ]When this script is run via Server Scheduled Scripts on the FileMaker Server, if the plug-in could not connect, it would return an error to the $result variable such as:
ERROR: Connect: Connect: Could not resolve Host Name to IP Address. WinSock Error: 11001; Host not foundSince the script contained no error checking and it was using Set Variable, the error would be lost as soon as the script finished running, so you would never see the error. To fix this problem, add error checking to the script. This would look something like:
Set Variable [ $result ; FTPit_Connect(“myserver”) ]
If[ PatternCount( $result ; “ERROR:”) > 0 ]
Set Field [ db::result ; $result ]
Exit Script
End If
Now when the $result variable contains the word “ERROR:” (Note, all errors from the plug-in start with this), the script will use the Set Field script step to write the data in the $result variable to the “db::result” field. Also, since an error occurred, the script is stopped with the Exit Script script step.
Set Field
Now let’s take the same Connect function, but use a Set Field instead of a Set Variable.
Set Field [ db::result ; FTPit_Connect(“myserver”) ]When this script is run via Server Scheduled Scripts on the FileMaker Server, if the plug-in could not connect, it would return an error into the “db::result” field. Now when you realize the Server Scheduled Script did not work properly, you could log into your database via FileMaker Pro and look at the “db::result” field to see the error. This script will properly write the data to the database, however, the script will still continue running even after encountering the error. Because of this, it is still important to add error checking even when using Set Field. To fix this problem, add error checking to the script like we did previously:
Set Variable [ $result ; FTPit_Connect(“myserver”) ]
If[ PatternCount( $result ; “ERROR:”) > 0 ]
Exit Script
End If
This will now look for the error and stop the script if it occurs.
Looking at the results from the plug-in is vital in understanding what the plug-in is doing and determining how to fix problems when they arise. The importance of the results is magnified with the Server Edition of the plug-in since you cannot debug your scripts that are running on the FileMaker Server. So, writing robust scripts that include error checking to analyze the results is extremely important no matter if you are using Set Variable or Set Field.
Upload and Download Scripts
To understand how the example scripting works, open ScriptMaker/Manage Scripts and edit the Upload script. Note, the Upload and Download scripts are exactly the same with the exception of the function that actually transfers the file.
Perform Script [ “Account Setup” ]The script starts off by calling the “Account Setup” script. Open this script from ScriptMaker/Manage Scripts.
Set Field [ FTP::Result; Let([mkact = ts & FTPit_AddAccount( “The_Server”)… ]The “Account Setup” script has only one script step. Select the Set Field script step and click the “Calculated result: Specify” button in the bottom right corner. You will now be looking at the “Specify Calculation” window with the following:
Let([
mkact = ts & FTPit_AddAccount(“The_Server”)
];
ts & FTPit_SetAccountOption(“The_Server”;“Host”; Settings::Host ) & “¶” &
ts & FTPit_SetAccountOption(“The_Server”;“Port”; Settings::Port ) & “¶” &
ts & FTPit_SetAccountOption(“The_Server”; “Timeout”; Settings::Timeout ) & “¶” &
ts & FTPit_SetAccountOption(“The_Server”; “TLSType”; Settings::TLSType ) & “¶” &
ts & FTPit_SetAccountOption(“The_Server”;“Username”; Settings::Username ) & “¶” &
ts & FTPit_SetAccountOption(“The_Server”;“Password”; Settings::Password ) & “¶” &
ts & FTPit_SetAccountOption(“The_Server”; “Passive”; Settings::Passive ) & “¶” &
ts & FTPit_SetAccountOption(“The_Server”; “DataPortRangeStart”; Settings::DataPortStart ) & “¶” &
ts & FTPit_SetAccountOption(“The_Server”; “DataPortRangeEnd”; Settings::DataPortEnd ) & “¶” &
mkact
)
This calculation may look complex, but really the complexity is just because it is adding formatting to the data so the “FTP::Result” field looks nice and readable. It starts with a Let statement and creates a variable named “mkact” which calls the AddAccount function to create the “The_Sever” account in the Server Edition plug-in. The SetAccountOption function is then called multiple times to set different properties in the account such as Host, Port, and etc. Each property is set with data from a field in the Settings table.
The “ts” at the beginning of each line is simply a custom function in this example database that returns the current time stamp so when we look at the Result field, we know at what exact time each function was run. You will see the “ts” custom function again later in the scripts.
Finally, you may ask why the AddAccount function was set as a variable in the Let statement and then added at the very end of the calculation. Formatting. This was purely for formatting purposes in the Result field. The scripting in this example is appending to the Result field so when you look at the field, the oldest calls show at the bottom of the field, so the most recent results are always at the top. So, when you are looking at the Result field you would see all this data being added to the Account, and then the account was created. To make the Result field show the Account being created first, it was necessary to use a Let statement to show the Account creation last in the calculation . This is because FileMaker is calculating the above calculation from top to bottom, but the script is displaying the results in the field from bottom to top, so again, this was just for formatting purposes.
If we did not care about formatting the Result field, the calculation could have looked as simple as the following and the functionality of the plug-in would have been exactly the same.
FTPit_AddAccount(“The_Server”) & “¶” &
FTPit_SetAccountOption(“The_Server”;“Host”; Settings::Host ) & “¶” &
FTPit_SetAccountOption(“The_Server”;“Port”; Settings::Port ) & “¶” &
FTPit_SetAccountOption(“The_Server”; “Timeout”; Settings::Timeout ) & “¶” &
FTPit_SetAccountOption(“The_Server”; “TLSType”; Settings::TLSType ) & “¶” &
FTPit_SetAccountOption(“The_Server”;“Username”; Settings::Username ) & “¶” &
FTPit_SetAccountOption(“The_Server”;“Password”; Settings::Password ) & “¶” &
FTPit_SetAccountOption(“The_Server”; “Passive”; Settings::Passive ) & “¶” &
FTPit_SetAccountOption(“The_Server”; “DataPortRangeStart”; Settings::DataPortStart ) & “¶” &
FTPit_SetAccountOption(“The_Server”; “DataPortRangeEnd”; Settings::DataPortEnd )
The script has now set the FTP server details in the plug-in, so close the “Specify Calculation” window and the “Account Setup” script, and open the “Upload” script again.
If [ PatternCount(FTP::Result; “ERROR:”) > 0 ]The script then checks for errors from the Account Step. This is done using an If statement to check the Result field for “ERROR:”, which is the syntax the plug-in will always return errors in. This uses the FileMaker function PatternCount, which will check a piece of data for the existence of a word or phrase. In this case it is checking the FTP::Result field to see if there are any occurrences of “ERROR:”. If this phrase does exist in the field, the PatternCount function will return the number of times it exists. So, anything over zero will make the If statement true, which means an error occurred.
 Exit Script []
End If
If an error did occur, the Exit Script script step will be called to stop the script.
Set Field [ FTP::Result; ts & FTPit_Connect( “The_Server” ) & “¶” & FTP::Result ]This step calls the FTPit_Connect function to connect to the FTP server and gets uses the name of the account (“The_Server”) that was created in the “Account Setup” script. In addition, this Set Field step includes a reference to itself. By including “FTP::Result” in the calculation, the field appends data onto the data that already exists in the field. If this was not included in the calculation, the result from the FTPit_Connect function would overwrite any data that already existed in the Result field. The script appends to the field to make sure no errors are accidentally lost.
If [ PatternCount(FTP::Result; “ERROR:”) > 0 ]
Exit Script []
End If
We check for errors again and if an error occurred, exit the script.
Set Field [ FTP::Result;
ts & FTPit_ChangeLocalDir( FTP::LocalPath ) & “¶” &
ts & FTPit_ChangeRemoteDir( FTP::RemotePath ) & “¶” &
FTP::Result]
This step calls the FTPit_ChangeLocalDir and FTPit_ChangeRemoteDir functions to change the current directory we are looking at on the local computer (the FileMaker Server computer) and the directory on the FTP server.
If [ PatternCount(FTP::Result; “ERROR:”) > 0 ]
Perform Script [ " Disconnect" ]
Exit Script []
End If
As before, we check for errors in the Result field. If an error occurred, we call the Disconnect script to disconnect from the FTP server and exit the script. The difference between this error checking routine and the first one is that at this point in the script, the plug-in is connected to the FTP server. So, if an error happens we must disconnect from the server before exiting the script. The plug-in connection to the FTP server will automatically timeout after a period of time, but when possible you should always disconnect from the FTP server.
Set Field [ FTP::Result;
ts & FTPit_UploadFile( FTP::Filename) & “¶” &
ts & “Starting Upload…¶” &
FTP::Result ]
The FTPit_UploadFile script step is used to actually upload the file. The name of the file is contained in the FTP::Filename field which is passed to the FTPit_UploadFile function. The directories we are working with were defined a few steps back using the FTPit_ChangeLocalDir and FTPit_ChangeRemoteDir functions. As before, the “Starting Upload” text is just for formatting in the result field and is not required. Note, the “FTPit_UploadFile” and “FTPit_DownloadFile” functions are the only difference between the “Upload” and “Download” scripts.
Perform Script [ " Disconnect" ]Finally, the script calls the Disconnect script to close the connection between the FTP server and the plug-in. No error checking was added here because we are disconnecting and the script is ending anyways.
How to recreate in your solution
After you have gone over the example databases, learned how they work and how the plug-in works, you can integrate the plug-in into your own solutions. There are many ways this can be done, but here are a few of the most common ways.
Note, to properly integrate the plug-in into your own solution you need to be proficient at FileMaker scripting and calculations. While our documentation tries to provide some tips, teaching all the ins and outs of FileMaker scripting and calculations is beyond what we do. FileMaker offers many training options to help you further your FileMaker developing skills. If you are looking for a professional developer to integrate the plug-in into your solution, you can search for one on FileMaker's Consultants site.Import example script
This is the easiest way to go, but can be the most frustrating at the same time. When importing a script, you will have to go back over the imported script with a fine tooth comb. Field references will be different between the example database and your own database, so you will have to touch every script step to make sure all field references are correct. This will mainly deal with the Set Field script step (but check all the script steps to make sure they are correct for your database). Select the Set Field step and check the “Specify target field” button to make sure that field is correct. Then check the “Calculated result” button and make sure any field (and table names) are correct. If you find /* */ at the beginning and end of the calculation, FileMaker has commented out the code because of incorrect field references. You will need to fix all field references, and then remove the /* */ from the beginning and the end.
Re-create example script
Print out or view the example script and re-create it in your own database. Since you will be creating the script as you go, you are less likely to overlook an incorrect field reference as you would with Importing an example script. This method helps you to better understand what your script is doing since you are actually creating the script yourself.
Create script from scratch
If you went over all the example databases, you should have a pretty good idea what a script would look like. Using the function browser to give you more information about the functions, you can create a script to send an email exactly as you need it. Click the “Functions” tab to open the function browser. Remember to build error checking into your scripts. This is very important and will save much frustration later when something stops working and you have no idea why and no errors to go by.
Be sure to check out the Coding Considerations section for some helpful tips on working with the plug-in functions and writing scripts.