Introduction
There are two ways to include images in HTML messages. The first is to reference an image that is served on a webserver. This way works, but requires the user to be online when the message is viewed. The second way actually encodes the image as part of the message so that the user can see the email as intended even if they are not online.
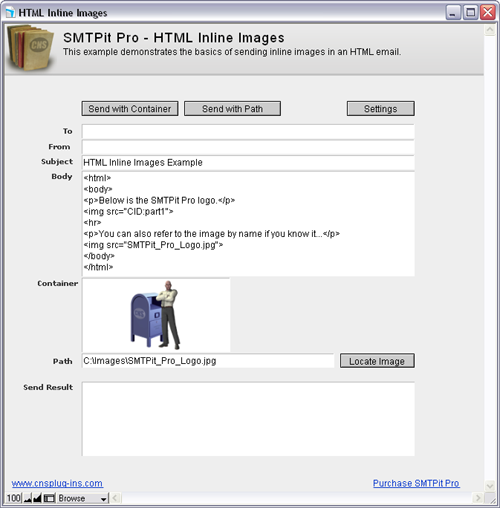
This example demonstrates including an inline image in an HTML message. The first button, “Send with Container”, uses the image in the “Container” field. The second button, “Send with Path”, uses the path in the “Path” field for its inline image.
 HTML Inline Images example database
Download Example File
Settings
- Before you can send email from this database, you will need to enter a few settings. At bare minimum, you will need to enter your email host. The default host port is 25, but you may need to change this depending on your email server. If your email server requires authentication, you will need to choose an authentication type and enter your username and password. If your email server requires an SSL connection, you can set the SSL field to the correct SSL type. If you are unsure of which type to use, try both to see which works.
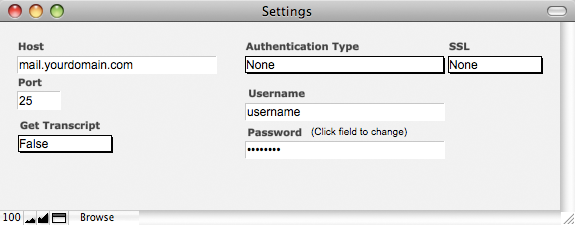
SMTPit Pro will always return information back to you when you make a function call. You can also get a transcript of of the interaction between SMTPit Pro and your mail server by setting the field “Get Transcript” to true.
All of the fields mentioned above are used in various calculations throughout the example database. This approach allows the database to be portable in a sense because the database can be moved to a different computer without losing the settings.
Another approach for storing settings is to use the default values in the SMTPit Pro configuration dialog. In the configuration dialog you can add default headers and footers, and other various settings. These preferences will be stored on your computer only, so if you move a database to a different computer, you will need to visit the preferences dialog to enter your settings. There are advantages to using both methods, and it will be up to you to decide which one will fit your needs.
Need help? Don't know what to use as your Settings or getting errors when trying to send?
Take a look at this article. Access the Plug-in
When using plug-ins (not just ours), they do not add new script steps, but instead add new functions that are available in the calculation engine.
To see a calculation that tells the plug-in what to do, go to the “Scripts” menu, and choose “Manage Scripts” or “ScriptMaker”. Once in Manage Scripts/ScriptMaker, double click on the “Send” script. Note that we are using the “Set Field” script step which consists of two settings. The “Specify target field” button allows you to choose which field you want to set. In our case we want to set the “Result” field. The second specify button is where the SMTPit Pro calculation exists. Click this button to see the calculation used to tell the plug-in what to do.
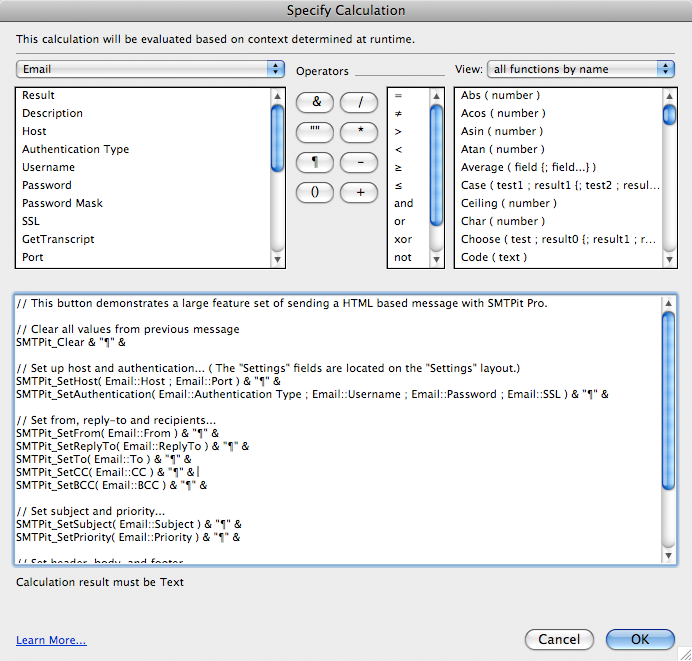
In this calculation, the plug-in is accessed using the “SMTPit_FunctionName” functions. There are many functions allowing you to do different things such as set the To address, Subject, and etc. For a complete listing of the functions available, see the Functions tab. You can also access the functions in a “Specify Calculation” window by clicking the “View” menu, then selecting “External Functions”, and then scrolling through the list until you find the plug-in name.
Send With Container Script
This script is a basic SMTPit Pro calculation with few additions.
First, the “SMTPit_SetInlineImage” function is used to add the image in the “Container” field to the email message.
SMTPit_SetInlineImage( Email::Container )Second, the image is referred to in the body of the HTML message. This is what determines where the images appears in the HTML body and can be done in two ways. The first way is to refer to the image by its part number. This can make it simple to refer to a sequential set of images. The HTML code looks like:
<img src=“CID:part1”>The second way is to refer to the image by name:
<img src=“image_name.jpg”>You will need to replace “image_name.jpg” with the name of your image in order for the image to be shown.
See the SMTPit_SetInlineImage function in the Function Reference for the list of HTML tags that Inline Images work with.Send with Path Script
Like the “Send with Container” script, this script is a basic SMTPit Pro calculation with few additions.
The first addition, the “SMTPit_SetInlineImage” function is used to add the image referenced in the “Path” field to the email message.
SMTPit_SetInlineImage( Email::Path )This should be a full path to an image file. Use the “Locate Image” button to locate an image easily. The button will set the “Path” field to the image you choose.
Second, the image is referred to in the body of the HTML message. This can be done in two ways. The first way is to refer to the image by its part number. This can make it simple to refer to a sequential set of images. The HTML code looks like:
<img src=“CID:part1”>The second way is to refer to the image by name:
<img src=“image_name.jpg”>You will need to replace “image_name.jpg” with the name of your image in order for the image to be shown.
See the SMTPit_SetInlineImage function in the Function Reference for the list of HTML tags that Inline Images work with.View Results
This example has a Send Result field where the Results are shown. This is where the plug-in can give you feedback on what it is doing. If an error occurs, it will report the error in the results field which can help you fix any issues you may be having. It will also report its successes so that you know everything is going as planned. If you have “Get Transcript” set to true on the settings layout, you will also see the interaction between SMTPit Pro and your mail server in the Result field.
Need help? Getting errors when trying to send?
Take a look at this article.How to recreate in your solution
To add an HTML inline image to your own solution, you will need to use the “SMTPit_SetInlineImage” function. To reference the image(s), you can use a container field with an image in it, a path in a field, or a path directly in the calculation. For example:
SMTPit_SetInlineImage( “/Images/logo.gif” )
or
SMTPit_SetInlineImage( table::container )Further, you need to reference the images in your HTML. This is what determines where the image appears in the HTML body.
<img src=“CID:part1”>Or using the image name:
<img src=“SMTPit_Pro_Logo.jpg”>If you use the part number, you can reference images in the order that you added them using the “SMTPit_SetInlineImage” function. For example, suppose you have two container fields named “container1” and “container2”. Container1 contains an image named “flower.jpg” and container2 contains an image named “truck.jpg”. You can set the images from both fields like this:
SMTPit_SetInlineImage( db::container1) & “¶” &

SMTPit_SetInlineImage( db::container2 ; “HTML” ; SMTPit_Append)
Since the flower.jpg image in the “db::container1” field was set first, it is part1. The truck.jpg image in the “db::container2” field was set second, so it would be part2. You could then reference both images in your HTML as follows.
<img src=“CID:part1”>

<img src=“CID:part2”>
When the above email is received, the flower.jpg image would appear where you put the CID:part1, and the truck.jpg image would appear in place of CID:part2. As mentioned previously, you can alternatively use the name of the image in your HTML instead of using the part numbers.