Introduction
One of the first questions to arise when we first introduced SMTPit Classic was “Can I send a layout?”. The answer was always a hesitant “Yes, but…..”. In other words, it’s always been possible, but not really all that feasible because there was so much set up.
With the advent of SMTPit Pro, it is safe to say. “Yes, you can email a layout.” This is due to some changes in the FileMaker Plug-in API which allow plug-ins to interact with container fields in a way that we could not before.
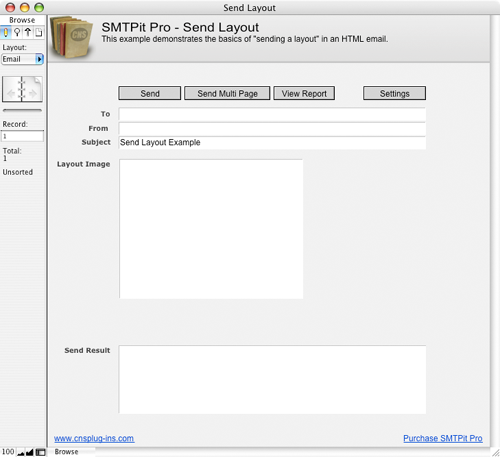 Send Layout example database
Download Example File
Settings
- Before you can send email from this database, you will need to enter a few settings. At bare minimum, you will need to enter your email host. The default host port is 25, but you may need to change this depending on your email server. If your email server requires authentication, you will need to choose an authentication type and enter your username and password. If your email server requires an SSL connection, you can set the SSL field to the correct SSL type. If you are unsure of which type to use, try both to see which works.
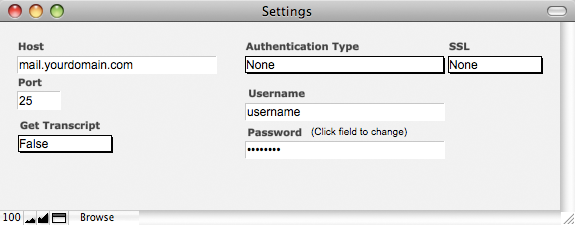
SMTPit Pro will always return information back to you when you make a function call. You can also get a transcript of of the interaction between SMTPit Pro and your mail server by setting the field “Get Transcript” to true.
All of the fields mentioned above are used in various calculations throughout the example database. This approach allows the database to be portable in a sense because the database can be moved to a different computer without losing the settings.
Another approach for storing settings is to use the default values in the SMTPit Pro configuration dialog. In the configuration dialog you can add default headers and footers, and other various settings. These preferences will be stored on your computer only, so if you move a database to a different computer, you will need to visit the preferences dialog to enter your settings. There are advantages to using both methods, and it will be up to you to decide which one will fit your needs.
Need help? Don't know what to use as your Settings or getting errors when trying to send?
Take a look at this article. Access the Plug-in
When using plug-ins (not just ours), they do not add new script steps, but instead add new functions that are available in the calculation engine.
To see a calculation that tells the plug-in what to do, go to the “Scripts” menu, and choose “Manage Scripts” or “ScriptMaker”. Once in Manage Scripts/ScriptMaker, double click on the “Send” script. Note that we are using the “Set Field” script step which consists of two settings. The “Specify target field” button allows you to choose which field you want to set. In our case we want to set the “Result” field. The second specify button is where the SMTPit Pro calculation exists. Click this button to see the calculation used to tell the plug-in what to do.
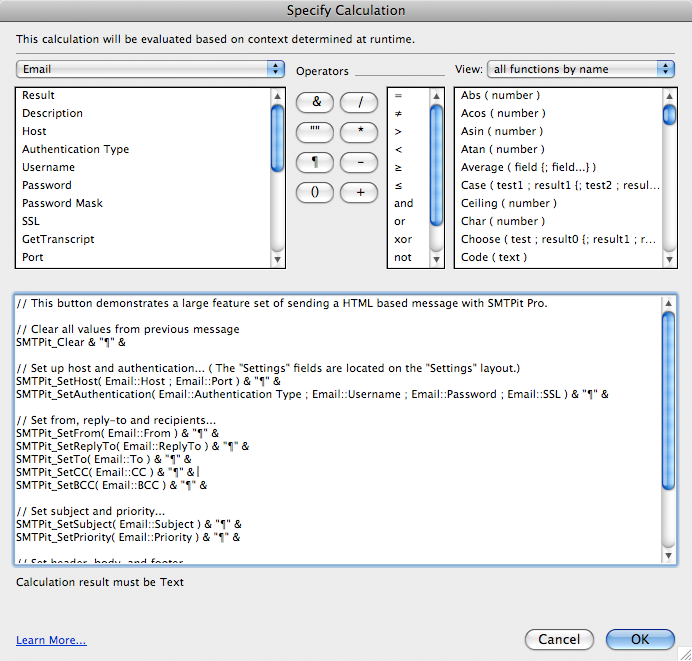
In this calculation, the plug-in is accessed using the “SMTPit_FunctionName” functions. There are many functions allowing you to do different things such as set the To address, Subject, and etc. For a complete listing of the functions available, see the Functions tab. You can also access the functions in a “Specify Calculation” window by clicking the “View” menu, then selecting “External Functions”, and then scrolling through the list until you find the plug-in name.
Send Script
The “Send” button on this layout runs the “Send Layout” script. This script is actually quite simple. Following is a general outline of what the script does:
- Enter Preview Mode for the current layout.
- Copy the preview image to the clipboard.
- Enter Browse Mode
- Paste the image from the clipboard into the "Layout Image" container field.
- Send message with the image as an inline html image.
This is a very simple version that sends the current layout. You can easily build more complex scripts to send different layouts and even multiple layouts and multiple pages with this method.Send Multi Page Script
This button calls the “Send Multi Page” script which will email a report as it appears in Preview mode. Basically, it is like printing to email.
To view the report, click the “View Report” button. The report will open in a new window. We did a little research on the net and found the “50 Largest World Metropolitan Areas”. We imported the data and then built this report which uses a sub-summary when sorted by Nation.
Now that you have seen the report, close it, and return to the “Email” layout. Make sure your email address is in the “To” field, and then click the “Send Multi Page” button. Should should receive an email shortly that looks exactly like the report you just viewed in FileMaker(R).
Following is an overview of the “Send Multi Page” script:
Set up page count
- Go to report layout.
- Sort by nation.
- Enter preview mode.
- Go to last page.
- Set "Page Total" field to the current page number.
- Set "Page Current" to "1".
Clear previous values and set opening HTML- SMTPit_Clear all to clear previous values.
- Set opening HTML tags with the SMTPit_SetBody function.
Loop through pages- Go to Report layout.
- Enter Preview mode.
- Go to record using the "Page Current" field.
- Copy the Preview image (Simply use the "Copy" script step.)
- Enter Browse mode.
- Go to "Send Layout" layout.
- Paste the preview image into the "Layout Image" field.
- Commit the record.
- Use "SMTPit_SetInlineImage" to add the current image in the "Layout Image" field.
- Use the "SMTPit_SetBody" function to add the current image to the html portion of the body.
- Set the "Page Current" field to itself plus "1".
- Return to step 9 until the "Page Current" number is greater than the "Page Total" number.
Send the message, and hide the status window- Show the status window.
- Set up host, authentication, from, to, subject, text body, and closing HTML tags.
- Send the message.
- Hide the status window.
View Results
This example has a Send Result field where the Results are shown. This is where the plug-in can give you feedback on what it is doing. If an error occurs, it will report the error in the results field which can help you fix any issues you may be having. It will also report its successes so that you know everything is going as planned. If you have “Get Transcript” set to true on the settings layout, you will also see the interaction between SMTPit Pro and your mail server in the Result field.
Need help? Getting errors when trying to send?
Take a look at this article.How to recreate in your solution
Both the “Send Layout” and “Send Multi Page” scripts may seem daunting at first. However, if you will read through the “Send” Script and “Send Multi Page” Script sections as well as their respective scripts, it will become clear just how simple it is.
The over all concept is this:
- Enter preview mode.
- Copy the preview image.
- Enter browse mode.
- Paste the image into a container field.
- Use the container field as an inline image using SMTPit Pro.