Introduction
This example is extremely similar to the “Sent Text Email” example with the exception of it being set up to send HTML rather than text. There is actually very little difference between the two examples.
 Send HTML Email example database
To understand the difference between the two, let’s take a look at the “SMTPit_SetBody” function. The prototype for the function is a follows:
SMTPit_SetBody( Content {; Type {; SMTPit_Append }} )In the “Send Text Email” example the function is used as follows:
SMTPit_SetBody( Send Text Email::Body ; “Text” )In this HTML example, it is used in the following manner:
SMTPit_SetBody( Send HTML Email::Body ; “HTML” )In other words, the only difference between the two is the value of the “Type” parameter, and the type of content in the respective “Body” fields. This same “Type” parameter can also be found in the SMTPit_SetBodyHeader, SMTPit_SetBodyFooter, and SMTPit_SetBodyWithFile functions.
Download Example File
Settings
- Before you can send email from this database, you will need to enter a few settings. At bare minimum, you will need to enter your email host. The default host port is 25, but you may need to change this depending on your email server. If your email server requires authentication, you will need to choose an authentication type and enter your username and password. If your email server requires an SSL connection, you can set the SSL field to the correct SSL type. If you are unsure of which type to use, try both to see which works.
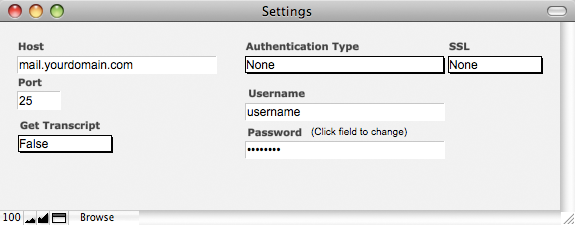
SMTPit Pro will always return information back to you when you make a function call. You can also get a transcript of of the interaction between SMTPit Pro and your mail server by setting the field “Get Transcript” to true.
All of the fields mentioned above are used in various calculations throughout the example database. This approach allows the database to be portable in a sense because the database can be moved to a different computer without losing the settings.
Another approach for storing settings is to use the default values in the SMTPit Pro configuration dialog. In the configuration dialog you can add default headers and footers, and other various settings. These preferences will be stored on your computer only, so if you move a database to a different computer, you will need to visit the preferences dialog to enter your settings. There are advantages to using both methods, and it will be up to you to decide which one will fit your needs.
Need help? Don't know what to use as your Settings or getting errors when trying to send?
Take a look at this article. Access the Plug-in
When using plug-ins (not just ours), they do not add new script steps, but instead add new functions that are available in the calculation engine.
To see a calculation that tells the plug-in what to do, open ScriptMaker by going to the “Scripts” menu, and choosing “ScriptMaker”. Once in ScriptMaker, double click on the “Send” script. Note that we are using the “Set Field” script step which consists of two settings. The “Specify target field” button allows you to choose which field you want to set. In our case we want to set the “Result” field. The second specify button is where the SMTPit Pro calculation exists. Click this button to see the calculation used to tell the plug-in what to do.
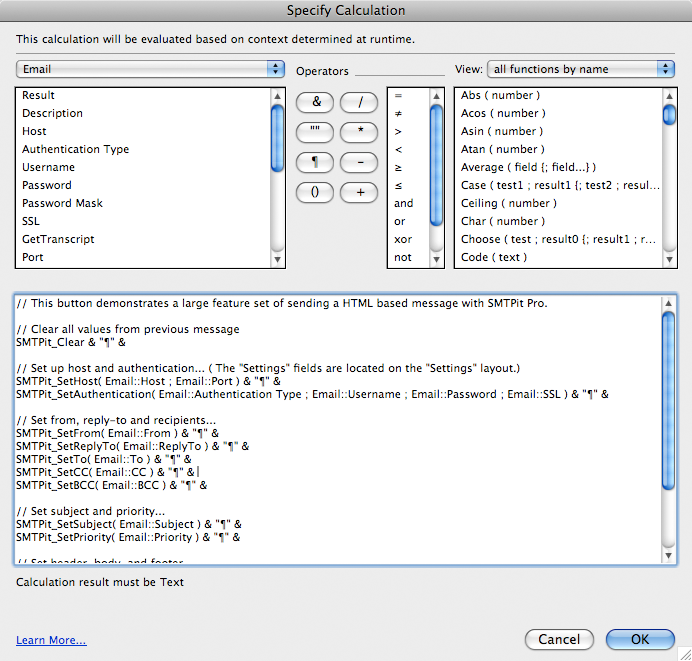
In this calculation, the plug-in is accessed using the “SMTPit_FunctionName” functions. There are many functions allowing you to do different things such as set the To address, Subject, and etc. For a complete listing of the functions available, see the Functions tab.
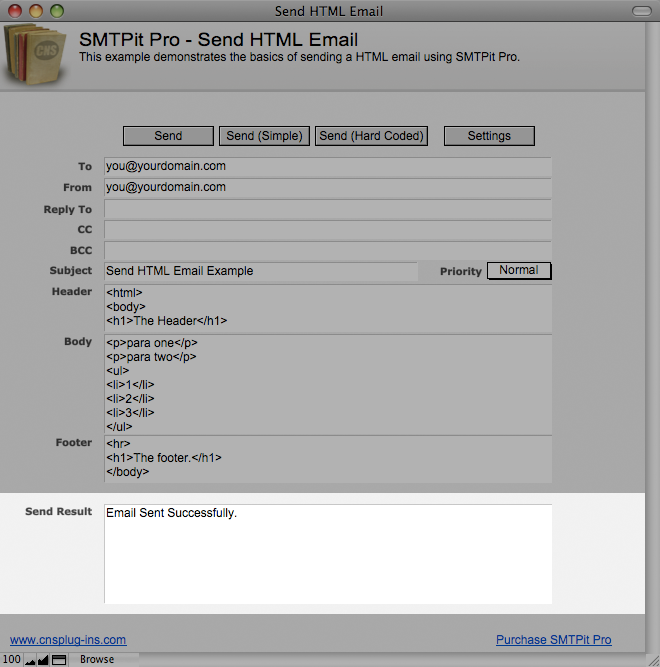
Send Button
This script demonstrates a large feature set of sending a HTML based message with SMTPit Pro. It uses all of the email fields on the layout. In order to send a message with the pure basics, take a look at the “Send (Simple)” script. This example, however, takes advantage of several SMTPit Pro features including Reply-To, CC, BCC, Header, and Footer.
The calculation has several comments in it to help clarify what all it is doing. To see how to view the calculation, look at the Accessing the Plug-in section.
The calculation can be broken down into six basic steps:
1. Clear previous valuesSMTPit_Clear & "¶" &It is important to clear out old values before setting new ones so that you do not get unexpected results. If you have set a value in a previous message that is not being set in the current message, the value from the previous message will still be used. For example, if you set a header in your previous message, but you are not setting the header in your current message, the header from the previous message will be used in your current message. The plug-in is purposefully set up this way so that you can set a value and then use it across several emails. For example, you may want to set the body with some specific text and then use a personalized header for each record in a found set. Under this circumstance, it makes sense to set the body once rather than for each record. Also note that you can clear specific values with the clear function. Be sure to visit the Functions tab or click on the SMTPit_Clear function for more details.
- Set host and authentication
SMTPit_SetHost( Email::Host ; Email::Port ) & “¶” &
SMTPit_SetAuthentication( Email::Authentication Type ; Email::Username ; Email::Password ; Email::SSL ) & “¶” &
You can set up the host and authentication a couple of different ways. You can do as we have here and use functions, or you can use the SMTPit Pro configuration dialog. It may be that your specific host does not even support authentication. It is up to you to determine what approach will best suit your needs.
- Set from, Reply-To, and other recipients
SMTPit_SetFrom( Email::From ) & “¶” &
SMTPit_SetReplyTo( Email::ReplyTo ) & “¶” &
SMTPit_SetTo( Email::To ) & “¶” &
SMTPit_SetCC( Email::CC ) & “¶” &
SMTPit_SetBCC( Email::BCC ) & “¶” &
In this portion of the calculation, we set the From, Reply-To, and the other recipients.
- Set subject and priority
SMTPit_SetSubject( Email::Subject ) & “¶” &
SMTPit_SetPriority( Email::Priority ) & “¶” &
This sets the Subject and Priority.
- Set header, body, and footer
SMTPit_SetBodyHeader( Email::Header ; “HTML” ) & “¶” &
SMTPit_SetBody( Email::Body ; “HTML” ) & “¶” &
SMTPit_SetBodyFooter( Email::Footer ; “HTML” ) & “¶” &
In this portion of the calculation, we set the Body Header, Body, and Body Footer.
- Send the message
SMTPit_Send( Email::GetTranscript ) & “¶¶”
Finally, we send the message using the SMTPit_Send function. The send function has two optional parameters that you can use if so desired.
Conclusion…
If you take out all of the comments, and your host and authentication is set up in the SMTPit Pro preferences, you could use the following calculation to send this basic message, and the result field will return the status of each function in a readable manner:
SMTPit_Clear & “¶” &
SMTPit_SetFrom( Email::From ) & “¶” &
SMTPit_SetTo( Email::To ) & “¶” &
SMTPit_SetSubject( Email::Subject ) & “¶” &
SMTPit_SetBody( Email::Body ; “HTML” ) & “¶” &
SMTPit_Send- Set host and authentication
Send (Simple) Button
This script demonstrates how to send a HTML message with only a few SMTPit Pro functions. To learn how to view the calculation, see the Accessing the Plug-in section.
The calculation consists for four main parts:
- Clear previous values
- Set Up Host and Authentication
- Set Message Values
- Send the Message
Sending the email is accomplished by using the above SMTPit Pro functions. Be sure to check out the Functions tab, to gain a better understanding of what each function is capable of doing.
Send (Hard Coded) Button
This button is very similar to the “Send (Simple)” button. The “Send (Simple)” button uses fields to get the value for each SMTPit Pro function, while the “Send (Hard Coded)” button uses text strings directly in the functions.
For example, in the simple version, the “To” value is set as follows:
SMTPit_SetTo( Email::To )In the hard coded version, the “To” is set as follows where “to@yourdomain.com” should be replaced with a real email address:
SMTPit_SetTo( “to@yourdomain.com” )You can mix and match the way you use functions. For example you could hard code the “From” address and use a field for the “To” address, as follows:
SMTPit_SetFrom( “from@yourdomain.com” ) & “¶” &
SMTPit_SetTo( Email::To )
You can even mix hard coded values and field values inside the same function:
SMTPit_SetSubject( "Some Text " & Email::Subject )Using the hard coded approach could be used in several places in FileMaker. You could have a script that uses the “Set Field” script step to send an email once the script is complete. You could also have a text field that uses an auto-enter calculation to send a message when a new record is created. In other words, you can send an email in any calculation that FileMaker has available.
View Results
- This example has a Send Result field where the Results are shown. This is where the plug-in can give you feedback on what it is doing. If an error occurs, it will report the error in the results field which can help you fix any issues you may be having. It will also report its successes so that you know everything is going as planned. If you have "Get Transcript" set to true on the settings layout, you will also see the interaction between SMTPit Pro and your mail server in the Result field.
Which field the results is placed in is determined by your scripting. For example, look at the “Send” script. You will see one Set Field script step. If you select the script step, and click the Target field “Specify” button, the field that is selected will be the field the plug-in results will be returned into.
Need help? Getting errors when trying to send?
Take a look at this article. How to recreate in your solution
There are several ways to recreate these scripts in your own solution. The easiest way is to simply import the scripts through ScriptMaker and then edit so the field names and strings match fields in your solution.
For example, you could import the “Send (Hard Coded)” script into your own solution and it would work as is, provided you have updated the values with your own information.
You could also import the “Send (Simple)” script to your own solution and then update each field to a field in your solution. For example, you would need to change the “Email::To” field reference to your own which could be something like “Contacts::To”. You may also want to hard code information such as the From setting.