Download Example File
Introduction
 Crop example database
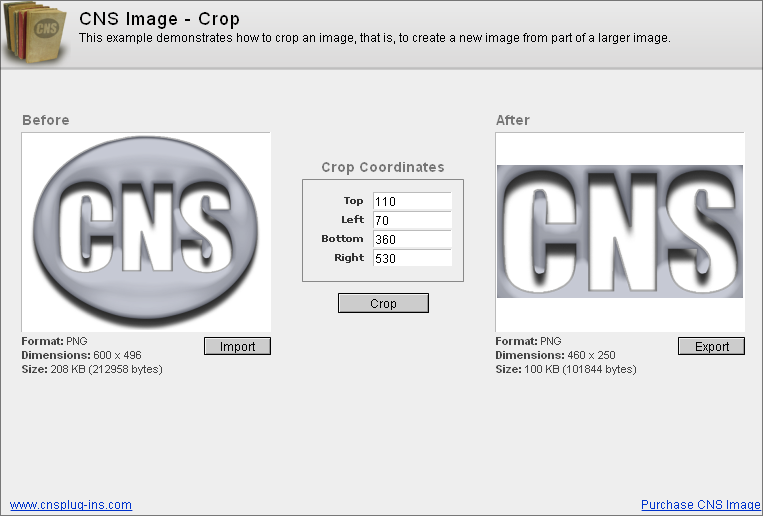
This example demonstrates how to crop an image, that is, to create a new image from part of a larger image.
Access the Plug-in
When using plug-ins (not just ours), they do not add new script steps, but instead add new functions that are available in the calculation engine.
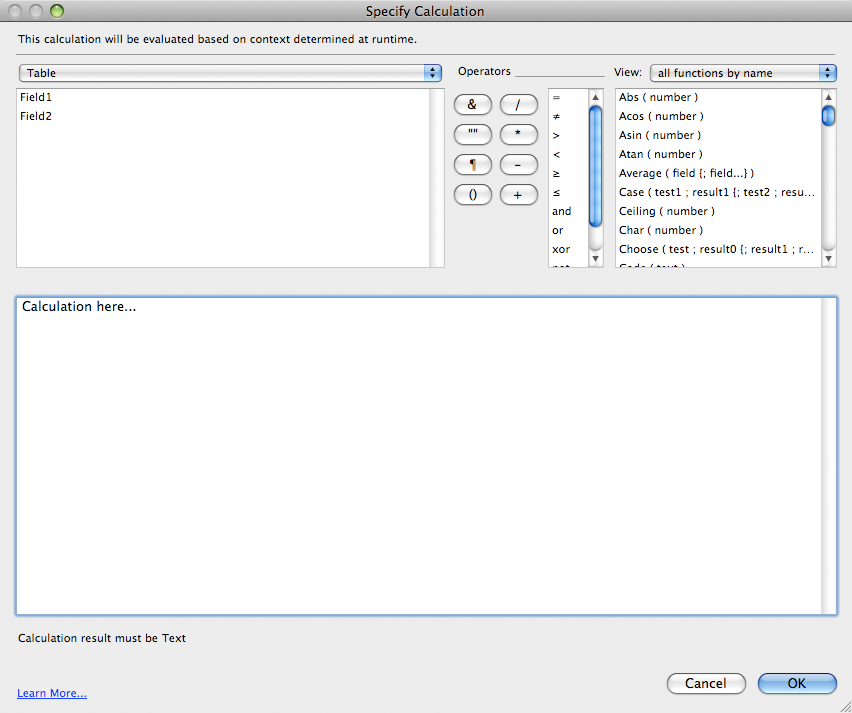
The “Specify Calculation” window as shown in the image above is found in many different places in FileMaker. The most common places to use the plug-in is within the "Set Field or “Set Variable” script/button steps.
In FileMaker’s “Specify Calculation” window, the plug-in is accessed using the “CNSImage_FunctionName” functions. To find a list of these in FileMaker, click “View” menu in the top right corner of a “Specify Calculation” window, select “External Functions”, and then scroll through the list until you find the plug-in name. There are many functions available that allow you to do a variety of different things. For a complete listing of the functions and help for each one, see the Functions tab of the CNS Image Knowledge Base.
Crop Script
To understand how this example works, open ScriptMaker/Manage Scripts and edit the Convert script.
Set Field[Image::Edited; CNSImage_Crop( Image::Original; Image::Top; Image::Left; Image::Bot…The script uses the Set Field script step to set the “Image::Edited” field with the new image that is returned from the plug-in. Select the Set Field and click the “Calculated result:” Specify button in the bottom left corner.
CNSImage_Crop( Image::Original; Image::Top; Image::Left; Image::Bottom; Image::Right)The CNSImage_Crop function allows you to remove outer parts of an large image to create a new smaller image. The function has separate parameters for setting each of the four pixel coordinates to define the new image. To understand what the above code is doing, take a look at the prototype of the function:
CNSImage_Crop ( Image ; Top ; Left ; Bottom ; Right )The first parameter is the source image you want to convert. In the example database, the image is in the “Image::Original” field, so that field is passed to the plug-in as the first parameter. The second parameter is the top pixel of the Top, Left corner of the crop rectangle and the value is in the “Image::Top” field. The same is true for the remaining parameters. Note, the crop rectangle is an imaginary box that is not actually displayed anywhere, but is illustrated by the blue box in the image below.
 In this image, the Top parameter is 110, the Left parameter is 70, the Bottom parameter is 360, and the Right parameter is 530.
For more information about this function, see the CNSImage_Crop function in the Function Reference.
How to recreate in your solution
After you have gone over the example databases, learned how they work and how the plug-in works, you can integrate the plug-in into your own solutions. There are many ways this can be done, but here are a few of the most common ways.
Note, to properly integrate the plug-in into your own solution you need to be proficient at FileMaker scripting and calculations. While our documentation tries to provide some tips, teaching all the ins and outs of FileMaker scripting and calculations is beyond what we do. FileMaker offers many training options to help you further your FileMaker developing skills. If you are looking for a professional developer to integrate the plug-in into your solution, you can search for one on FileMaker's Consultants site.Import example script
This is the easiest way to go, but can be the most frustrating at the same time. When importing a script, you will have to go back over the imported script with a fine tooth comb. Field references will be different between the example database and your own database, so you will have to touch every script step to make sure all field references are correct. This will mainly deal with the Set Field script step (but check all the script steps to make sure they are correct for your database). Select the Set Field step and check the “Specify target field” button to make sure that field is correct. Then check the “Calculated result” button and make sure any field (and table names) are correct. If you find /* */ at the beginning and end of the calculation, FileMaker has commented out the code because of incorrect field references. You will need to fix all field references, and then remove the /* */ from the beginning and the end.
Re-create example script
Print out or view the example script and re-create it in your own database. Since you will be creating the script as you go, you are less likely to overlook an incorrect field reference as you would with Importing an example script. This method helps you to better understand what your script is doing since you are actually creating the script yourself.
Create script from scratch
If you went over all the example databases, you should have a pretty good idea what a script would look like. Using the function browser to give you more information about the functions, you can create a script to send an email exactly as you need it. Click the “Functions” tab to open the function browser. Remember to build error checking into your scripts. This is very important and will save much frustration later when something stops working and you have no idea why and no errors to go by.
Be sure to check out the Coding Considerations section for some helpful tips on working with the plug-in functions and writing scripts.