Audit Existing Data
CNS Audit is normally invoked when a record is committed and at that point it compares the data in the committed record with the Audit Trail data in the CNS Audit Log database. When adding CNS Audit to an existing database with existing data (as opposed to a new database), the CNS Audit Log will not contain any Audit Trail data for the database at the point CNS Audit is implemented. If there is no previous entries for any given record in the CNS Audit Log when a record is audited, CNS Audit will create new entries for the record, but any values in the record prior to the audit will be lost. CNS Audit offers two solutions for this situation: ###Solution 1
CNS Audit includes a function named CNSAudit_RecordOpen. This function is similar to the CNSAudit_RecordDelete function in that it’s used in the Custom Record Privileges for each table in your database. By using this function with the Edit Custom Record Privilege, CNS Audit is able to capture the current state of the record before any edits are made. This function also logs an Open action to the CNS Access Log table. Follow these instructions to add the CNSAudit_RecordOpen function.
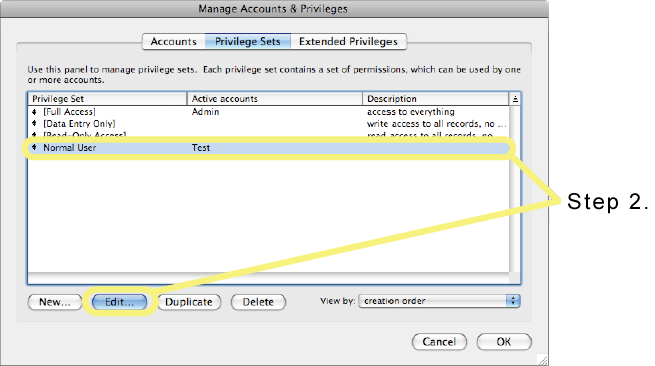
- Open up the Accounts & Privileges / Manage Security dialog.
- Switch to the Privilege Sets tab and edit the first custom privilege set.
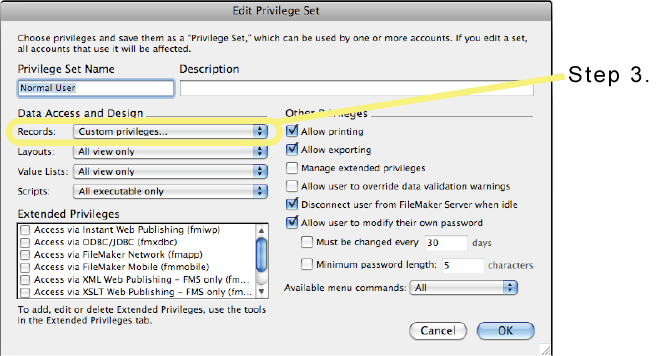
- In the Data Access and Design section, press the Records drop-down menu and select Custom Privileges.
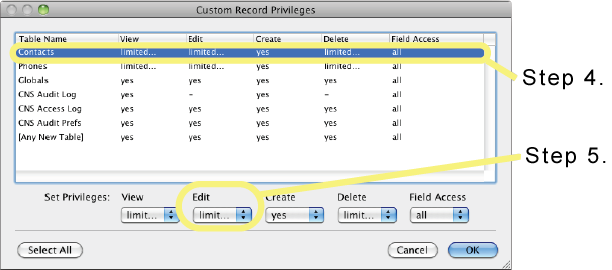
- In the Custom Record Privileges dialog that pops up, select the first table.
- Press the Edit drop-down menu and select limited....
- In the Specify Calculation dialog that pops up, change the View drop-down to External Functions.
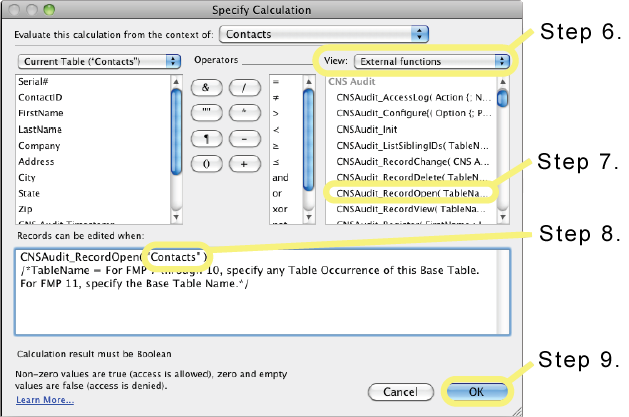
- In the list of functions, scroll down until a line for CNSAudit_RecordOpen is visible and double-click it.
- Determine if your database will only be used by client versions of FileMaker Pro 11 or above:
- If so, replace the TableName parameter with the Base Table Name of the table you are editing the privileges of.
- If not, specify any Table Occurrence Name of the table you are editing the privileges of. (At the top of the Specify Calculation dialog is the Evaluate this calculation from the context of setting. You can use the same Table Occurrence name in your calculation as is selected in that setting.)
- Press OK to close the Specify Calculation dialog.
- Repeat steps 5-9 for each table in the Custom Record Privileges dialog. (Once the CNSAudit_RecordOpen function has been added to one calculation, copy and paste it to the other ones, or just retype it, and skip selecting the External Functions repeatedly. Make sure you update the TableName parameter for each table, though.)
- Press OK to close the Custom Record Privileges dialog.
- Press OK to close the Edit Privilege Set dialog.
- Repeat steps 3-12 for each custom privilege that needs modifying.
- Press OK to close the Accounts & Privileges / Manage Security dialog.
CNS Audit includes a function named “CNSAudit_Init” that can create an initial set of Audit Trail data. This function will look for every table in your database that contains the CNS Audit Trigger field (ie. tables that have been set up for auditing) and examine every record in those tables to determine if that record has been audited. If it has not, or if the record indicates there was some error the last time it was audited, then CNS Audit will create a set of initial records in the CNS Audit Log table to reflect the state of the record at that moment. After using “CNSAudit_Init” the CNS Audit Log table will contain all necessary information for rolling back changes to the database up to the point that the “CNSAudit_Init” function was used.
Some important information about this function: This function examines every single record in every single table that has been set up for auditing and will create a record in the CNS Audit Log table for every single field in each of those records. For any database that has a moderate to large number of records, the “CNSAudit_Init” function can take hours to complete and will easily triple or quadruple the size of your database. While it’s possible to run the “CNSAudit_Init” function on a database that is hosted via FileMaker Server, the process will complete much faster if it’s brought down from the server and run locally before being hosted again. Unless it’s absolutely necessary that you have a full audit of every single record in your database (eg. to recreate the database from an empty clone), using the “CNSAudit_RecordOpen” solution above to only track changes as they happen is probably a better choice.
Follow these steps to use the “CNSAudit_Init” function:
- Open up the ScriptMaker / Manage Scripts dialog.
- Create a script named Init File or something similar.
- Add a Set Variable script step and double-click it. If using FileMaker Pro 7, use a Set Field script step and set a field in the database with the same calculation as the Value calculation for the Set Variable script step.
- In the Set Variable Options dialog that pops up, name the variable $CNSAudit or something similar.
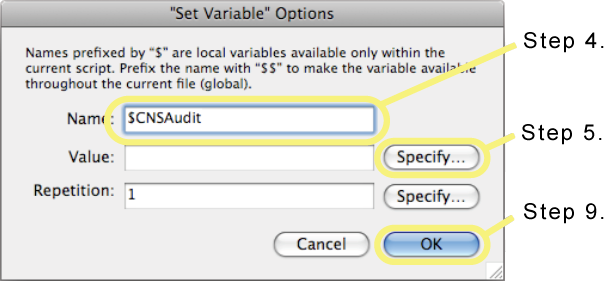
- Press Specify... next to the "Value" field.
- In the Specify Calculation dialog that pops up, change the View drop-down to External Functions.
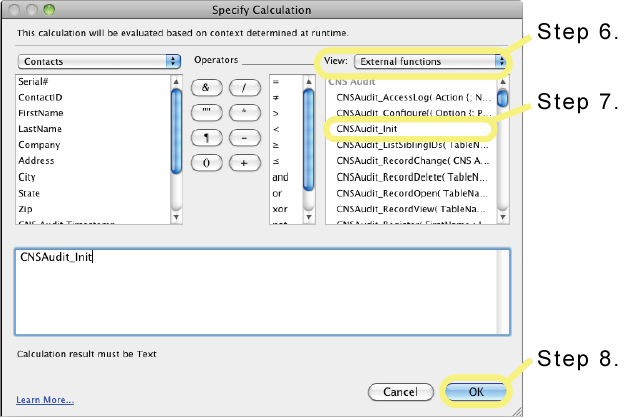
- In the list of functions, scroll down until a line for CNSAudit_Init is visible and double-click it.
- Press OK to close the Specify Calculation dialog.
- Press OK to close the Set Variable Options dialog.
- Save and close the Init File script window.
Run the Init File script to initialize the CNS Audit Log table with the data from the database. If the CNS Audit Log table has not yet been created, this function will create it and ask you to run the Init function a second time to process the database.
Notes:
- While running, the CNSAudit_Init function shows a dialog with a progress bar and a Cancel button. The initialization process can be stopped at any time by pressing the Cancel button. The process can then be started again by running CNSAudit_Init again and it will pick up where it left off.
- The CNSAudit_Init function can be called at any time after CNS Audit has been implemented in a database and can be called multiple times if the need arises. For example, if for some reason CNS Audit was not installed on a computer that was using the database, any records added on that computer would not be audited. The CNSAudit_Init function could be used to create Audit Trail data for those records added on the computer that did not have CNS Audit installed.