Configure the plug-in
Now the plug-in is installed, you can set the default preferences in the plug-in Configuration Dialog.
*Note*, the default preferences in the Configuration Dialog are only used
if you do not set a preference in your scripts using the plug-in's functions.
In other words, any preference you set in your scripts using the plug-in functions
will be used *instead* of these values.
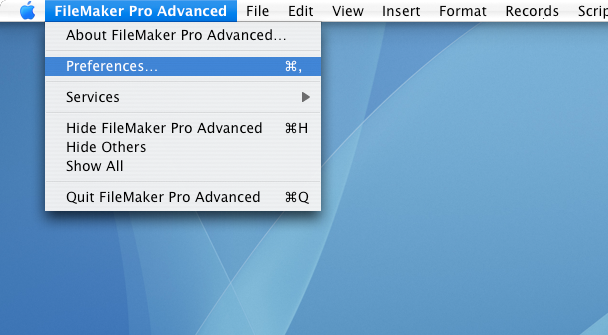
On Mac OSX, go to the "FileMaker Pro" menu, and then select "Preferences".
This will bring up FileMaker Pro's "Preferences" dialog.
Navigating to the Plug-ins tab in the FileMaker Preferences
Next, click on the "Plug-ins" tab, which should give you a dialog as shown. Now,
select the plug-in name and click the "Configure" button or double-click the plug-in
name which will open the plug-in's Configuration Dialog.

FileMaker Plugins Tab
If the plug-in has not been registered, you will be presented with the Welcome dialog.
Here you can request demo key and then continue
to the Configuration Dialog. If you just want to access the Configuration Dialog without
getting a demo key, click the "No Internet" or "Close" button. If the plug-in is registered,
or you have already gotten a demo key, you may not see this dialog.

Welcome Dialog
Now you are in the plug-in Configuration Dialog where you can specify the default
settings of the plug-in. As mentioned before, these settings are only used if
you do not set them in your database scripts using the plug-in's functions.
Note, not all of our plug-ins have settings that need to be configured.

CNS Audit Configuration Dialog
After configuring the plug-in, you can continue to Registering the plug-in if you purchased a license or skip to the Setup Guide.